 
Over 698,000 strictly plumbing related posts
Plumbing education, information, advice, help and suggestions are provided by some of the most experienced plumbers who wish to "give back" to society. Since 1996 we have been the best online (strictly) PLUMBING advice site. If you have questions about plumbing, toilets, sinks, faucets, drains, sewers, water filters, venting, water heating, showers, pumps, and other strictly PLUMBING related issues then you've come to the right place. Please refrain from asking or discussing legal questions, or pricing, or where to purchase products, or any business issues, or for contractor referrals, or any other questions or issues not specifically related to plumbing. Keep all posts positive and absolutely no advertising. Our site is completely free, without ads or pop-ups and we don't tract you. We absolutely do not sell your personal information. We are made possible by: 
|
|
Author:
sum (FL)
I purchased this triplex several months ago, and found a big surprise a few days ago.
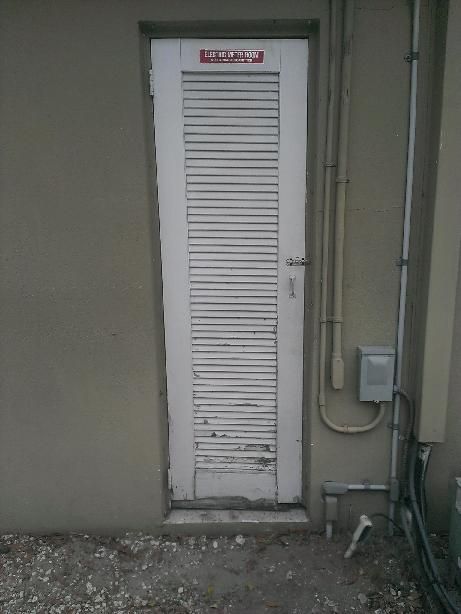
There is a small electrical meter room where the electric meters are. Inside were a lot of junk, concrete blocks, window panels, hurricane panels...the inspector and I only looked at the meters, the disconnects.
After I took possession, I dumped out a lot of the junk and inside is empty.
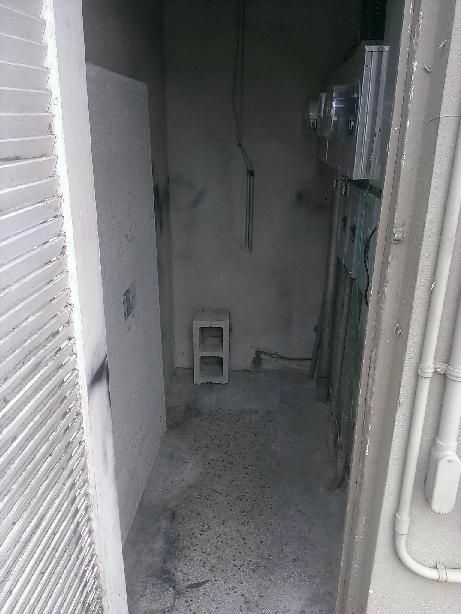
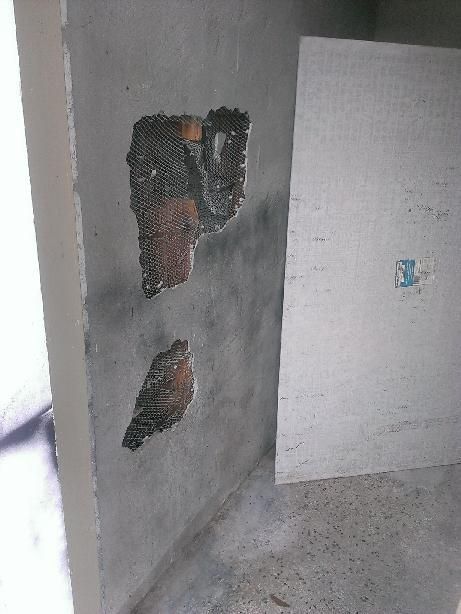
Now there is a piece of cement board leaning against the back wall. Once I moved the board away I saw two holes in the plaster wall.
So the board was there to cover the holes, and the junk was there so no one would bother to look behind it.
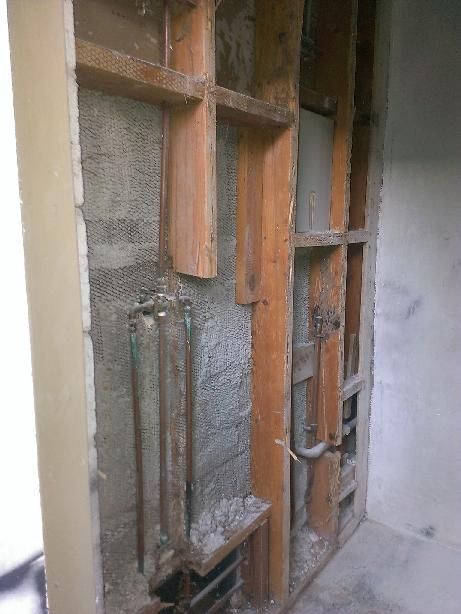
The big concern is a piece of the 2X6 stud was removed. I need to figure out if this is supporting anything (it being a flat roof structure I have no access to the attic, well, there is no attic).
Looking into the holes it seems they were opened up to make some plumbing repair in the past.
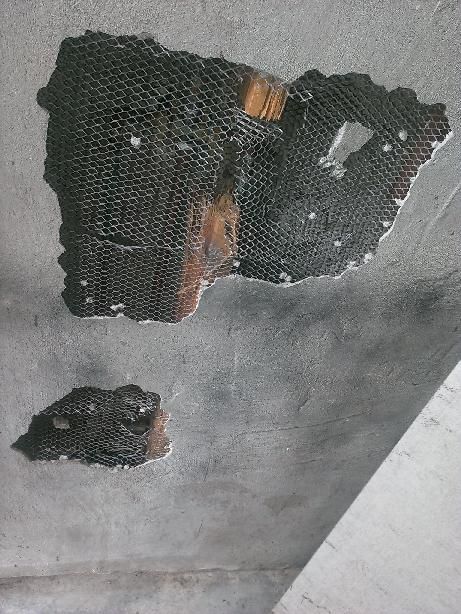
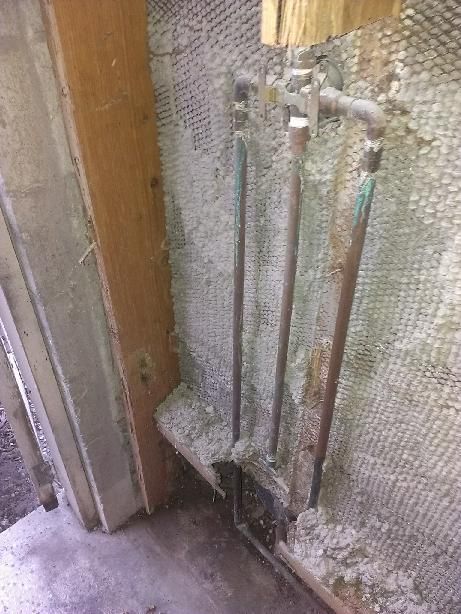
Here is a look at the larger hole on top, with the mesh pulled back. It is right where the valve is.
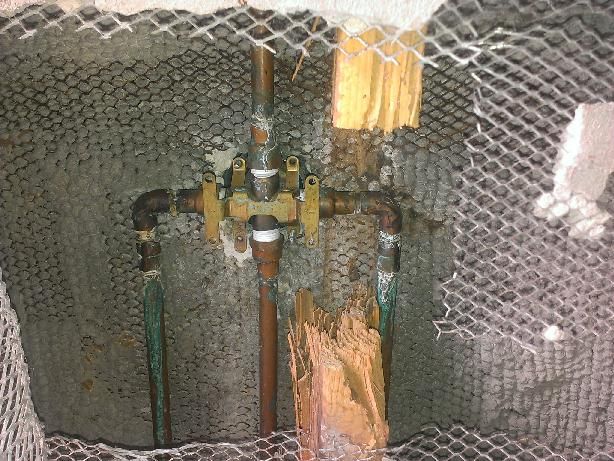
The smaller hole below is the tub faucet.
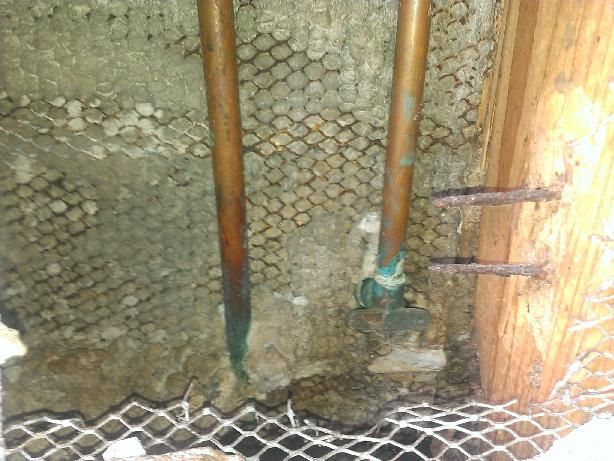
This is a picture of the other side of the bath.
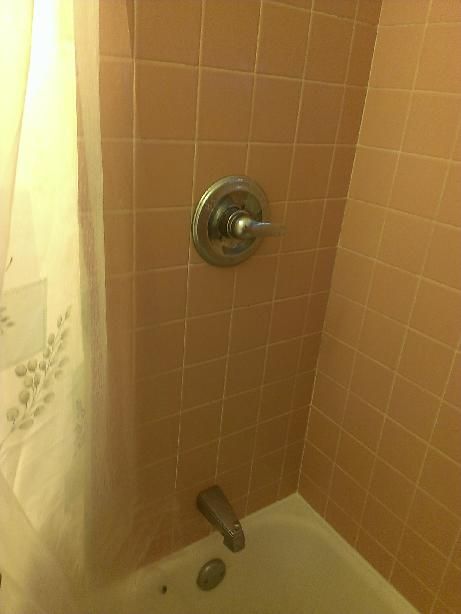
Now looking at these pictures, I imagine the previous owner had to change out the valve and the tub faucet? They didn't want to break the tiles, so they went to the back side and opened the holes in the plastered wall of the electrical room.
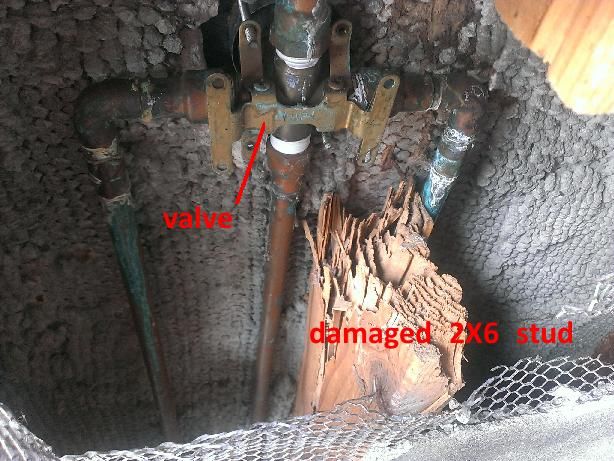
The 2X6 stud was in the way so they had to remove some of it, they decided to remove the whole chunk.
Does the new plumbing look OK? I don't like that they used teflon tape on metal to metal connections, I would have used pipe joint compound. Also they didn't anchor down anything to anything solid. Other than that anything that is concerning on the plumbing side?
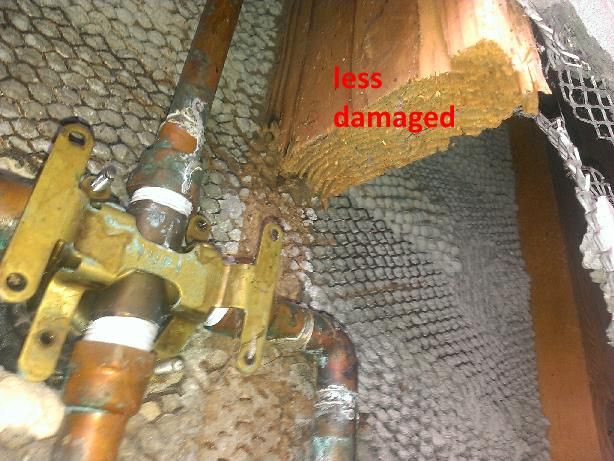
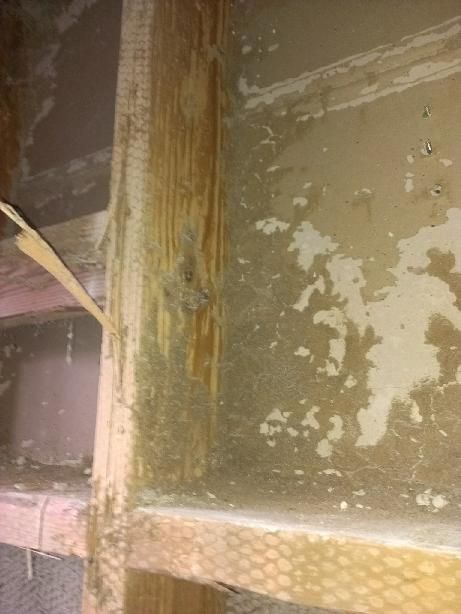
Now onto the stud. It is very peculiar to me that the section of the wood below doesn't have most of the "fiber" of the wood. I am trying to figure out if this is due to water damages and rot, or was it due to some termites eating up the wood, or someone strong like a gorilla snapped off that studs then cut it square with a saw later.
If it's water damages, I am sure many of you have seen this, I would think there should be streak marks, water marks, discoloration on the wood right?
To me it seems like termites have been eating through this studs and turned it into swiss cheese, then someone cut it out to do the plumbing repair.
The reason I am asking is if I should open the can of worms bigger, cut out a bigger section to expose the bottom plate to see what that piece of wood look like, because if this is termites or water damages then chances are the bottom plate should be worse, and I need to open this hole bigger to repair the stud anyways.
If you see something on the plumbing side I should address, I might as well do it while I have it open.
Edited 3 times.
|
|
Post Reply
|
|
|
Author:
Plumber3 (FL)
They cut this stud to make it easier to replace the valve. Teflon tape is normal BUT pipe dope should have been used also. Looking at the solder job, this guy might have overheated the joints causing the pipe dope to melt and you don't see it. The old valve could have been leaking in the wall and bottom plate could be water damaged if it isn't pressure treated lumber. As long as the damage isn't severe you could screw another piece of 2x4 onto the side of the existing two pieces forming a bonding stud. Don't be nervous, this is done quite often in plumbing as the stud center winds up where the shower valves go. If this bathroom was newly added then that's why the stud falls center of valve, in new construction good plumbers make the carpenters build/frame around where the tub/shower valve goes. BUT, he should have scabbed a piece onto the other sections of stud top and bottom to reinforce the wall. Run the water and go around the back and make sure nothing is leaking while using it before you seal up the wall.
|
|
Post Reply
|
|
|
Author:
KCRoto (MO)
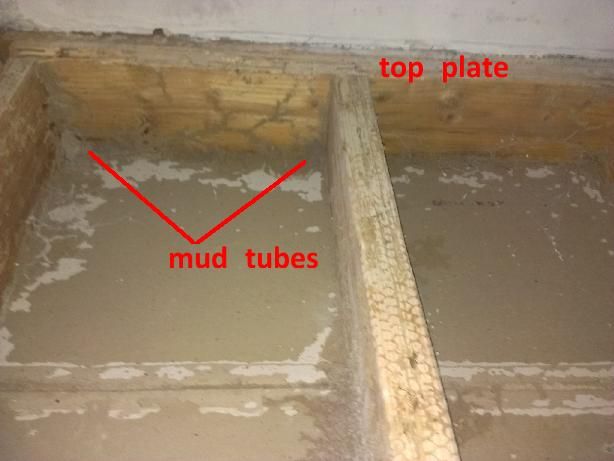
Sum it looks to me like the first guy was busting plaster, then just kept using a hammer to smash at the 2X6 instead of getting out the saw to begin with. It looks like the wood itself is fairly intact in terms of water or pest damage, but the only sign that I know to watch for with termites is mud tubes where they drag up soil with them as they climb. It looks ok really.. I wondered about the white residue on the piping, whether it was where something had leaked, but it isn't as bad as what I usually see on active leaks. I would carefully cut the 2x6 square above and below and replace the missing portion with a section of 2x4 and sandwich the entire section with 1/2 inch plywood on either side. I wouldn't start messing with with possible problems at this juncture until you are ready to do a complete bathroom remodel (or more if you start tearing out the bottom plate).
|
|
Post Reply
|
|
|
Author:
steve (CA)
As KC stated, I would recut the bottom square, fill the gap and sister studs alongside.

|
|
Post Reply
|
|
|
Author:
Plumber3 (FL)
Good repair technique on the stud, also try to replace the bottom backer board for the tub spout. I can see the nails sticking through where there used to be a cross member stud for support on the spout pipe. You might also want to check the riser for the shower head to make sure it's supported. You might want to scrub off the patina on the copper pipes, this was caused by the plumber that didn't clean his pipes off well after soldering them and left flux on the pipes. And again, run the shower and spout and check for leaks when these are charged before repairing the wall.
|
|
Post Reply
|
|
|
Author:
hj (AZ)
quote; in new construction good plumbers make the carpenters build/frame around where the tub/shower valve goes
Good luck making the carpenters do ANYTHING. They construct the wall on the floor and then install it, long before the plumber sees the job.
|
|
Post Reply
|
|
|
Author:
sum (FL)
Steve, there is/was subterrainean termites found in two other spots so I am not surprised to find it here as well.
I already did a subterrainean termite treatment along the perimeter two weeks ago, the pest control company came and drilled holes in concrete walkways and dug all around the foundation and pumped in some liquids that he said will destroy any termite colony that's passing through the perimeter. I am hoping the sub termites are gone. In about a month's time I will be doing a tenting to get rid of the drywood termites up top, after the roofing repairs are done.
|
|
Post Reply
|
|
|
Author:
sum (FL)
I don't really have the skills to do these old style plaster repair with the lath.
So for me to repair this I have to enlarge the holes to a rectangular shape and put in a filler piece.
To enlarge the hole I will need to get to the next stud, get a bit higher to make sure I am getting solid wood on this cut stud, and most likely it will be easier to have one big hole instead of two smaller ones. So taking all this into account, I might as well make one big rectangular hole, to the next stud over, and all the way to the bottom, may be I will repair the stud with one piece from bottom to where it's cut, as the piece in the bottom looks so bad.
|
|
Post Reply
|
|
|
Author:
sharp1 (IL)
As it is a utility space, once you have repaired the framing, it would be easier and more convenient for future service to just cover it with a panel painted to match the wall.
|
|
Post Reply
|
|
|
Author:
Fixitangel (NC)
My bet: Once upon a time somebody decided to change out the shower valve. Busted thru the wall with a hammer, and wanted the 2 x 6 stud section removed to make it easier. They cut thru the top part of the stud with a saw. Sum, you have termite damage on the lower section. They didn't need to use a saw to cut it. It is so rotted that one good tug probably was all it took to rip it out.
Have your bug guy look at it, and treat the wood/area to stop further infestation. Then shore up the stud with a 2 x 4 patch as others have mentioned. (use coated deck screws in case you ever need to get back in there) Last, cover it up by securing that backer board with some good anchor screws.
Edited 1 times.
|
|
Post Reply
|
|
|
Author:
sum (FL)
Fixitangel, there is/was subterrainean termites found in two other spots so I am not surprised to find it here as well.
I already did a subterrainean termite treatment along the perimeter two weeks ago, the pest control company came and drilled holes in concrete walkways and dug all around the foundation and pumped in some liquids that he said will destroy any termite colony that's passing through the perimeter. I am hoping the sub termites are gone. In about a month's time I will be doing a tenting to get rid of the drywood termites up top, after the roofing repairs are done.
|
|
Post Reply
|
|
|
Author:
Fixitangel (NC)
Sum, I hope your termites are gone, too. Just make sure you cover the holes to keep those giant Florida cockroaches out. 
|
|
Post Reply
|
|
|
Author:
Paul48 (CT)
Shhhh.........Palmetto Bugs not cockroaches, you'll scare the tourists away.
|
|
Post Reply
|
|
|
Author:
sum (FL)
I am still choking from the dust, but I decided to remove that whole section of the wall. The bad wood studs, the termites, etc... got me worried.
That piece of wood, it didn't stay. It came off with the wall board!
I got termite mud tubes all over, all the way up to the top plate. Yikes.
Some of the other pieces of wood are also severly rotted.
The bottom plate? It's not even there. It has turned into saw dust as it totally disintegrated from THE SWEEPING ACTION OF A BROOM!!!
I need to reframe this wall without messing with plumbing and without messing with the other side of this wall.
I think there was leaking at one time, water went down and there is the bath tub where they had a box for the tub drain, the slab was open there and only filled with dirt. Termites came up and attacked. They decided to fix the plumbing, but disregarded the structural damages and termite infestation.
I think when I reframe this I will put a header across the top of the valve, and put two "half studs to the bottom, that way the valve will not be in the way, and may be an access panel.
|
|
Post Reply
|
|
|
Author:
KCRoto (MO)
The best way I have found to cut out the bottom plate and bottom of the studs is to secure across the top of studs and run supports to the floor while you make repairs. A 2x12 works well for this, with a couple of 2x4 braces to carry the weight. Make sure that you fill in around the tub drain box with mortar to stop the termite superhighway. I noticed that the stud was compromised at the lavatory drain as well.
|
|
Post Reply
|
|
|
Author:
Paul48 (CT)
sum...Are you seeing any active termites?
|
|
Post Reply
|
|
|
Author:
sum (FL)
Paul, I didn't see any...but I can't be sure.
I mentioned earlier I found sub termites in another spot at a door jamb like 20' away, so had the house treated a month ago. That should have killed everything from the ground.
When I took down that wall it was a lot of noise and dust and debris hard to see I had a dust mask and goggles on. I looked and didn't see any moving things amongst the debris, but really can't be sure.
I am calling the termite guy and see if they can come back to treat this area now that it is opened up.
I am scratching my head how to repair the framing though. The woods are basically shot. But I can't pull them out because parts of it is still being nailed/screwed into from the wall board on the opposing side, and that is a bathroom tiled wall with a tenant. Its going to be a real pain to fix this situation. Like I have to slide in a piece of 2X6 PT bottom plate with the existing studs in place...looks like newvstuds would need to be 2X4s because the mudded wall on the other side makes it impossible to sister in 2X6s.
I have never seen termite damages this bad, wood fell apart like sheets of miniblinds.
Edited 1 times.
|
|
Post Reply
|
|
|
Author:
hj (AZ)
UNLESS you need that stud for anchoring, why worry about it? The roof is NOT going to collapse because one stud is cut off, or missing.
|
|
Post Reply
|
|
|
Author:
sum (FL)
hj, its not just the stud I took out, all four studs are bad in varying degrees, the top parts are better than bottom. The top plate is in bad shape too.
|
|
Post Reply
|
|
|
Author:
KCRoto (MO)
Attach a 2x12 across the top plate and anchor the top plate and all of the studs to it. Brace this with 2x4's for temporary supports. Cut off each stud at least 6" up from the bottom plate and remove the bottom, then remove the bottom plate. Install a new 2x6 bottom plate, and install 2x6 pieces from the bottom plate to the studs. Install new 2x4 studs sistered to the existing studs; run them full length from floor to ceiling. Attach them to the existing studs and screw them into the new bottom plate. The top 2x12 that you initially put up for support can be pulled down after the bottom plate is removed and the sections of 2x6 studs put back into place or you won't be able to put in full studs.
|
|
Post Reply
|
|
|
Author:
hj (AZ)
That is going to be quite a project with an existing "undamaged" bathroom on one side and the tub, sink, and toilet on the other. I would like to be there to see how he does it.
|
|
Post Reply
|
|
|
Author:
sum (FL)
hj come see it in person, I have plenty of beers and pina colodas.
|
|
Post Reply
|
|
|
Author:
hj (AZ)
After I left, you would STILL have a lot of them but your Dr. Pepper supplies would be low.
|
|
Post Reply
|
Please note:
- Inappropriate messages or blatant advertising will be deleted. We cannot be held responsible for bad or inadequate advice.
- Plbg.com has no control over external content that may be linked to from messages posted here. Please follow external links with caution.
- Plbg.com is strictly for the exchange of plumbing related advice and NOT to ask about pricing/costs, nor where to find a product (try Google), nor how to operate or promote a business, nor for ethics (law) and the like questions.
- Plbg.com is also not a place to ask radiant heating (try HeatingHelp.com), electrical or even general construction type questions. We are exclusively for plumbing questions.
Search for plumbing parts on our sponsor's site:
Special thanks to our sponsor:

|