 
Over 698,000 strictly plumbing related posts
Plumbing education, information, advice, help and suggestions are provided by some of the most experienced plumbers who wish to "give back" to society. Since 1996 we have been the best online (strictly) PLUMBING advice site. If you have questions about plumbing, toilets, sinks, faucets, drains, sewers, water filters, venting, water heating, showers, pumps, and other strictly PLUMBING related issues then you've come to the right place. Please refrain from asking or discussing legal questions, or pricing, or where to purchase products, or any business issues, or for contractor referrals, or any other questions or issues not specifically related to plumbing. Keep all posts positive and absolutely no advertising. Our site is completely free, without ads or pop-ups and we don't tract you. We absolutely do not sell your personal information. We are made possible by: 
|
|
Author:
sum (FL)
finally, we have a few days of dryer weather and I got to try and finish my main drain project.
I lined everything up and corrected all the kinks in the horizontal and vertical, to make sure everything is aligned, with the final connection from the 3" SCH40 PVC to the 3" old cast iron drain. I took some time to file and sand off the outside of the cast iron pipe until it's nice and smooth so it will make a good seal.

Everything is solvent welded downstream and I had the 3X2 wye rolled up 15 degrees so that with a 22.5 street elbow into it I can align it with the 2" CI kitchen drain coming sideways.
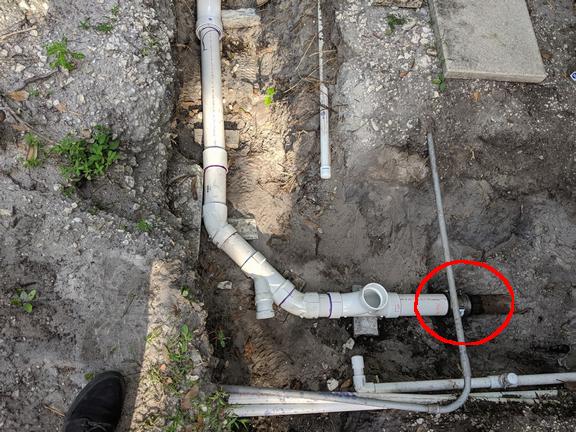
The problem is the connection from 3" PVC to what I thought was 3" cast iron. House was built in 1955 or so. This is original cast iron.
The coupling I decided to use is the Fernco "strong back" coupling, 1056-33RC, the inside diameter of the rubber is 3.46 inches.
When I made the connection from the 3" PVC to the cast iron with just the rubber sleeve (I removed the shield and bands first). I noticed a big gap on the cast iron side. The PVC is a snug fit. the cast iron side is very loose, almost 1/2"!
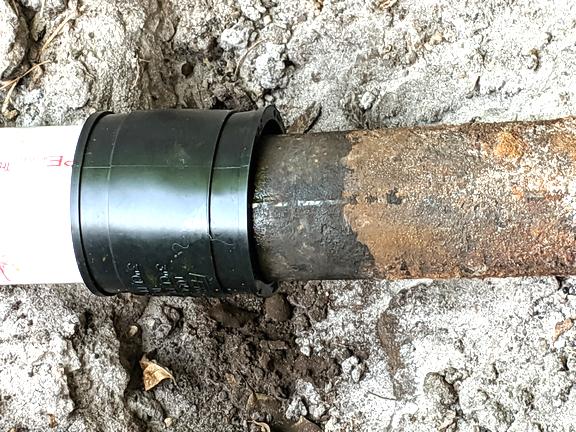
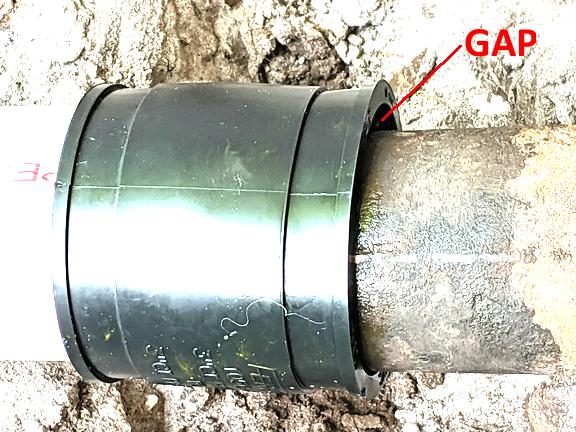
This is a bigger gap then I expected. Nevertheless I put the bands on and began to tighten, I tighten each one a little to make sure one side is not torqued down too much, then I repeat and repeat and before I even reach the 80#IN torque the metal shield in the middle is already crimped.


I don't think the issue is with the coupling, and I have done the installation very carefully.
I think the problem is the cast iron pipe OD is too small. I measured it and it's about 3", the OD. I just looked and 3" CI is supposed to be 3.3" OD. This is smaller. Do I have some odd ball cast iron pipe here?
HELP!
Edited 3 times.
|
|
Post Reply
|
|
|
Author:
steve (CA)
Sum, when was the house built? 40's? War effort to conserve material? How about getting a 3" S&D or copper coupling and cut the rubber to use as a bushing?
|
|
Post Reply
|
|
|
Author:
sum (FL)
steve, it was built in 1955, after the war.
I have worked on the 2" kitchen cast iron line last year at this house, and the 2" pipe was fine diameter wise.
I don't know why this CI pipe exiting the house is so "off".
There is no such a thing as a 2-1/2" cast iron pipe SV or XH right?
Edited 1 times.
|
|
Post Reply
|
|
|
Author:
sum (FL)
I just looked online on various cast iron pipe dimensions, and I do not see any size cast iron with an OD of close to 3". There are various tables from different manufacturers and not one has a matching pipe OD.
This makes absolutely no sense.

Edited 1 times.
|
|
Post Reply
|
|
|
Author:
bernabeu (SC)
you have what you have
try a 3 x 2-1/2 coupling - use butter inside the 2-1/2 side 
Quote
3" x 2-1/2" Flexible Coupling (Connects Cast Iron, PVC, Copper, Steel or Lead)
SKU: 1056-3/250
Brand: Fernco
[www.fernco.com]
==============================================
"Measure Twice & Cut Once" - Retired U.A. Local 1 & 638
|
|
Post Reply
|
|
|
Author:
NP16 (OR)
they make a CI x Pl adapter.
it will help you with the connection to the cast iron.
you will use a standard no hub coupling between the existing CI pipe and the new PVC adapter.
|
|
Post Reply
|
|
|
Author:
sum (FL)
bernabeu, this may work better, although the CI side being 2.88" will be real tight for a 3" OD fit even with butter.
but still I am puzzled by what I actually have. Why is this not standard CI size? I am sure it's cast iron, I sanded it and it has surface rust on it, the cut end is not even, obviously cut with a cast iron chain cutter when they switched to PVC.
I saw some copper drain sizes with OD near 3". Are there cast iron pipes made in copper drain sizes?
|
|
Post Reply
|
|
|
Author:
sum (FL)
NP16, the OD of CI is 3.3", and PVC is 3.5". I do have a 3" no hub adapter, it doesn't make a difference. I have used no hub adapters before thinking it will be more "aligned" with the cast iron size, but it really makes no difference between these no hub adapters have fins on the side that makes the rubber or neoprene gasket protrude even more so then straight PVC. Last time I had to use it I grind off the fins.
But in this case, the diameter difference is 0.5", this is just too much for the coupling I have at hand. The issue is I have non standard cast iron pipes with it's OD 0.3" smaller than regular CI pipes.
I need to find some special transition fittings for this to work, like the one bernabeu suggested, but I don't understand why the pipe is the size it is.
|
|
Post Reply
|
|
|
Author:
sum (FL)
how about this connector?
Fernco PROFLEX 3007-33 3" PL/ST/XH to 3" COPPER
[s3.amazonaws.com]
one side is 3.07" ID and the other side is 3.48" ID. That would fit the 3" OD cast iron.
|
|
Post Reply
|
|
|
Author:
packy (MA)
sum, do you thing this will work?
it says 3 inch inside x 3.5 inch outside.
[www.lowes.com]
|
|
Post Reply
|
|
|
Author:
sum (FL)
Packy, I doubt this one will work. If I understand you correctly you are suggesting using half of this as a "caulking" between the "small" cast iron pipe and the 3" rubber gasket right? Hence the 3" X 3.5".
In reading the reviews and the specification I think the 3"X3.5" are nominalXID. The 3" INSIDE is actually meant to fit inside a 3" CI hub which is way bigger than 3", and the 3.5" OUTSIDE is meant to fit a 3" PVC which is 3.5" OD to use it as a donut gasket to connect a PVC pipe to a CI hub. I think the inside diameter of this gasket is 3.5" and the outside diameter is much bigger.
|
|
Post Reply
|
|
|
Author:
sum (FL)
Was there ever at one time a 2.5" cast iron pipe or may be some foundry makes an slightly different size cast iron pipe?
|
|
Post Reply
|
|
|
Author:
bernabeu (SC)
butter is your BEST friend
==============================================
"Measure Twice & Cut Once" - Retired U.A. Local 1 & 638
|
|
Post Reply
|
|
|
Author:
Sauktim (WI)
Here's my two cents. Maybe metric as in European made? Or some odd cast iron down spout material...
|
|
Post Reply
|
|
|
Author:
sum (FL)
I doubt in 1955 they would be using European metric cast iron pipes.
Interestingly enough, the 2" cast iron pipe coming out of the kitchen drain at the same property is regular, standard 2".
I did some more search on the internet over the weekend and saw some old reference where someone said in passing that there were cast iron drains made in "copper size" which seems to be what I am looking at, but there is no more details that I can find. May be only old timers that have long retired would have come across these types of pipes. Someone who might be in the plumbing trade in 1950s would be 90 years old today.
Edited 1 times.
|
|
Post Reply
|
|
|
Author:
bernabeu (SC)
sum,
i'm from the late 60s
interesting find re: the CI sizing
sorta like the copper "B" tube disaster - B Cu tube was sized to IPS OD - it never 'caught on' as the resulting 'oversize' (due to the thin wall of copper) wreaked havoc on flow velocity calculations
originally, in NYC, all the 'new fangled' Cu required silver brazing and EXPENSIVE adapters for transitions EXCEPT for transition from brass pipe where a simple 'solder coupling' could be used
glad your problem is solved by a pvc-cu adapter 'fernco'
==============================================
"Measure Twice & Cut Once" - Retired U.A. Local 1 & 638
Edited 1 times.
|
|
Post Reply
|
|
|
Author:
Palm329 (VA)
Sum I understand this isn’t ideal but would it be possible to terminate your pvc with a 3” x 4” pvc adapter fitting, then sleeve the 4” side over the old cast iron pipe as deep as it goes... then basically “caulk” the gap with something, probably not lead like an old school cast iron bell hub but maybe something like a polyurethane glue or a plumbers putty or some closed cell spray foam or etc etc? Just to keep them in place and the bury it all and punt til the future sometime?
|
|
Post Reply
|
|
|
Author:
bernabeu (SC)
@ palm
???????????????????????? why, when a PROPER coupling exists ????????????????????????????
==============================================
"Measure Twice & Cut Once" - Retired U.A. Local 1 & 638
|
|
Post Reply
|
|
|
Author:
Palm329 (VA)
Bern - because as they say “perfection is the enemy of progress”!
I’m just suggesting a way to get it reconnected and all packed up and back in service using commonly available parts.
If this unicorn of a 3” copper x 3” plastic mission coupling designed for cast iron (ha ha) is readily available and can be used to get the toilets flushing again, then by all means I’d go for it also.
|
|
Post Reply
|
|
|
Author:
bernabeu (SC)
FERNCO 3007-33 coupling
[www.fernco.com]
have the local supply house (even the big box store) order one
==============================================
"Measure Twice & Cut Once" - Retired U.A. Local 1 & 638
|
|
Post Reply
|
|
|
Author:
sum (FL)
bernabeu, I bought the 3007-33 from a local plumbing supply store (they had one left that's been sitting for years). I bought it to use it as a "plan B" because that coupling, while it would work size-wise is rated for above ground applications only. But in a pinch I plan to use it then make sure there is good support for the pipes on either sides of the joint.
I actually thought about it over the weekend and decided on three possible solutions.
(1) To use the Fernco 3007-33 coupling. This is the easiest, I have one in my hand, only problem is it against manufacturer's recommendations.
(2) To go old school and find a short piece of 3" CI pipe with a hub end, find a plumber who can use oakum, lead and rope to join this short piece of CI to the existing odd size pipe, then I will have a standard 3" CI OD to join to from my PVC, and use the existing Fernco 1056-33RC coupling I have. This could be the most tedious and difficult, as I don't think such a plumber exist that is not yet retired, plus finding a new piece of 3" CI with a hub end could be a challenge.
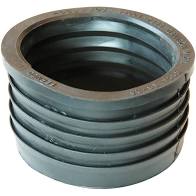
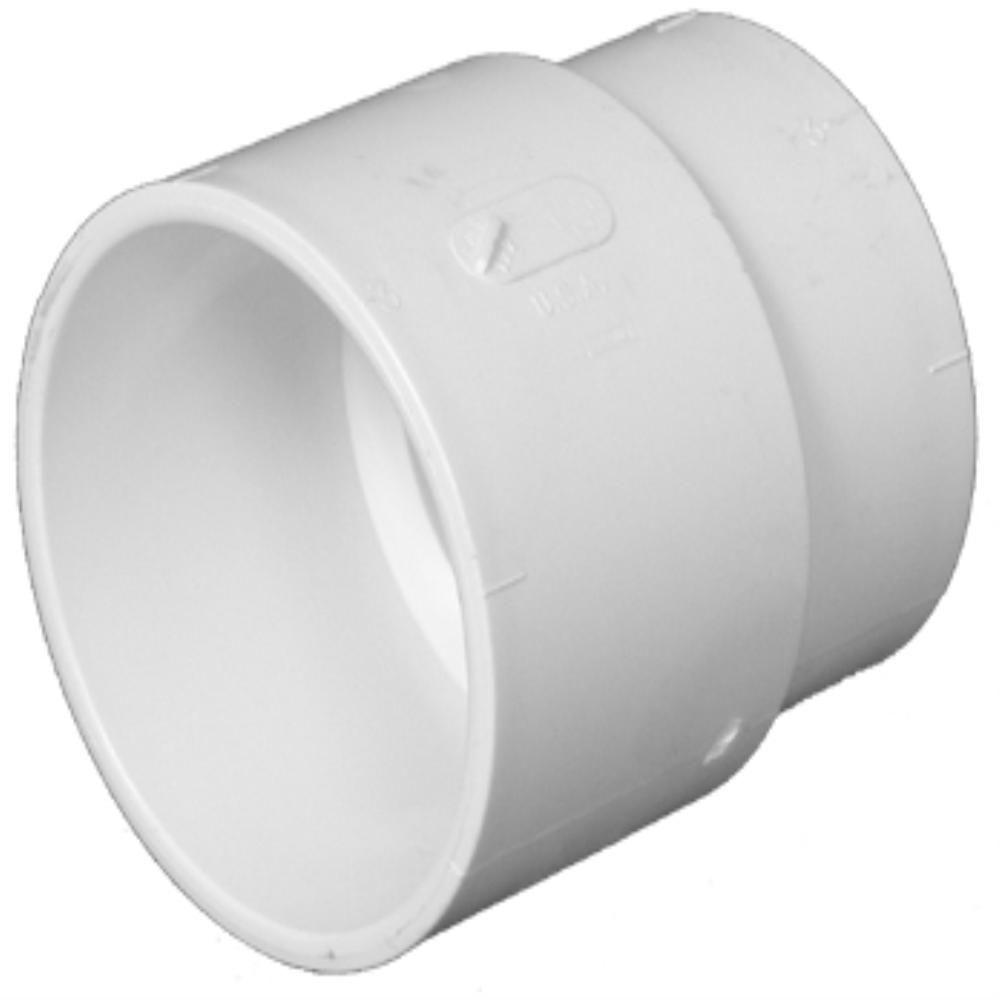
(3) I called Fernco, and spoke to their tech support. They had a suggestion for me similar to the 1056-3/250 transiton coupling Bernabeu suggested earlier. As it turns out, the 1056-3/250 is not a "special" coupling but a composite product. What that means is the 1056-3/250 is actually 1056-33 (straight coupling from 3.5 X 3.5) with an add on rubber reducer fitted on to the end that goes into the smaller end. So if you see a rubber fernco that is not -22, -33, -44, -66 etc...more than likely it is still a regular straight coupling fitted with a reducer on one end.
Here is a picture of the 1056-3/250, and you can see the top side there is an insert to make up the difference.

They have various sizes and combinations of reducers and one of them can reduce 3.50 to 3.00, and the part number is 3.490-3.000R. The 1056-3/250 is basically a 1056-33 plus a 3.490-2.8xxR reducer. So I ordered one through a local Ferguson but it will take ten days minimum and I don't know if I wanted to wait this long. It could get here sooner though.
Edited 1 times.
|
|
Post Reply
|
|
|
Author:
packy (MA)
sum, they make a 4 inch PVC adapter that fits over cast iron so it can be packed and poured and the smaller end glues onto PVC pipe.
i can find it in 4 inch bot not in 3 inch.
you don't need to find cast iron pipe to do option #2.
also, you can pack some oakum in the annular space and either use lead wool or plain old hydraulic cement to finish the cast iron end.
[www.homedepot.com]
|
|
Post Reply
|
|
|
Author:
Palm329 (VA)
Packy it seems to exist, google part number: PVC001220800
Again can’t this just be done with a simple 4x3 reducer? Half inch gap around to grout with the hydraulic cement or spray foam or etc... no need to worry about the rust or bubbles on the outside of the old CI?
|
|
Post Reply
|
|
|
Author:
packy (MA)
well, you could always use a sisson joint..

|
|
Post Reply
|
|
|
Author:
sum (FL)
packy, what is a sission joint? What does it do? are you trying to get me in trouble LOL?
Edited 1 times.
|
|
Post Reply
|
|
|
Author:
bernabeu (SC)
sisson joint = condom for piping (sealed with duck tape)
==============================================
"Measure Twice & Cut Once" - Retired U.A. Local 1 & 638
|
|
Post Reply
|
|
|
Author:
sum (FL)
palm329, there is no rust or bubbles on the outside of the existing CI, at least not at the end where I need to make the connection, I used a file then aluminum oxide paper to clear any irregularities off the outside, except for that longitudinal ridge from the casting.
Anyways I am waiting for the special order parts to come, hopefully tomorrow and I will be able to make the connection this weekend. I hate to hack it together then have to dig it up again later. I spent a lot of time on this project because it was A LOT of digging and cutting roots, and when I hurt my back I couldn't do it, the trench got filled up again due to it right below the edge of the roof overhang and every time it rains (which happens almost daily in South Florida), the rain coming down from the roof would wash the pile of dirt I excavated back into the trench again, I must have excavated and re-excavated this over three times.
Edited 1 times.
|
|
Post Reply
|
|
|
Author:
packy (MA)
sum, in the old days if you wanted to cut a "Y" into a cast iron run of pipe, you could not use a fernco rubber coupling because they were not invented. (we are talking lead and oakum joints here)..
so you would cut a piece of cast iron pipe out where you wanted the "Y" but there was no way to slip the fitting on because there was no lateral movement. so you cut out enough pipe as needed, slid the sisson joint over the pipe, put the "Y" into place and slid the sisson joint back so it bottomed out in the hub of the "Y". you then proceeded to pack and pour the 3 new joints.
|
|
Post Reply
|
|
|
Author:
bernabeu (SC)
or, assuming accurate measurements and cuts, installed a 'dutchman'
3 pieces of bell and spigot cast which could be 'bent/folded/finagled' into place (one piece being the Y)
rendering the condom un-necessary
==============================================
"Measure Twice & Cut Once" - Retired U.A. Local 1 & 638
|
|
Post Reply
|
|
|
Author:
sum (FL)
so packy, this is the equivalent of a "slider slip coupling" we use today to fix broken sprinkler lines.
I could see at least with sprinkler lines without a slip coupling at can do four 90s. With a CI drain could they do four 1/4 bends - it will kind of slow the flow and mess up the slope with all the elbows.
I just checked a sission joint in CI is like $100. That's expensive. I doubt there is any Floridian plumber who can pour a lead joint.
|
|
Post Reply
|
|
|
Author:
sum (FL)
or, cut the section out, cut a new section and insert it into the gap, the cut and insertion is so precise, the entire section held together by friction with no leak, even in an earthquake.
I have seen roofing installation with such skills, where roof tiles were placed such that it would not leak underneath even though there is no waterproofing membrane or even a deck on the underside. Yet I have seen roof deck installed, then felt paper with three layers of hot mopped tar then asphalt roof tiles, and it still leaked.
|
|
Post Reply
|
|
|
Author:
sum (FL)
While I am waiting for the rubber gasket part to arrive from Fernco, I have done more excavation on the 2" CI kitchen line that is to tie into the 3" I am working on.
Despite the connection to the odd size 3" CI, I am pretty happy that I am able to correct all the slope and kink issues, and I have the 2" branch of the wye lined up perfectly horizontally and vertically to the 2".

I am going to replace as much of the 2" as possible.
Good news is the 2" CI is standard size. I checked.

It says something like "C.F. CO V WT. 20 LBS" on the hub says "SV" which I think is service weight. So why is the 2" standard but the 3" odd sized?
Edited 1 times.
|
|
Post Reply
|
|
|
Author:
vic (CA)
Sum, besides our generous giving of their time to society highly experienced professional plumbers that I want to thank here right now I want to add that you as a "non-professional" (non-plumber) have been such a wonderful and awesome asset and part of our forum. You're awesome in so many ways.
Thank you so much for being here with your quality questions, thoughts, experiences, input and many photos. You've stated before that you've learned so much from our forum and I've also observed from the sidelines how you've grown a lot in your plumbing knowledge.
On many occassions I've also seen how you've helped many people by sharing your experiences.
Thank you and thank you all.
|
|
Post Reply
|
|
|
Author:
sum (FL)
Thanks vic, I try my best but sometimes my projects take forever LOL.
I do learn a great deal from everyone here, bailing me out of trouble time after time.
|
|
Post Reply
|
|
|
Author:
sum (FL)
packy, about the sission joint, if an existing CI pipe was cut, and a sission fitting was used to fit in a wye bu sliding the fitting back, wouldn't that create two problems?
(1) The wider part of the sission fitting when sliding back, would create a section inside that joint where the inside diameter is larger than the rest of the pipe, similar to what one would get if a pipe is not bottomed at the full depth of a hub, could cause debris to be stuck there.
(2) The existing pipe only inserted into the session joint half way, if they have to make a lead joint there, by inserting and packing oakum into the joint, the oakum could be pushed into the pipe because there is a bevel of a hub stopping it?
|
|
Post Reply
|
|
|
Author:
Palm329 (VA)
Looks great man... so in Florida do you need to bed those pipes in sand or gravel or do you just dump in the dirt and call it a day?
|
|
Post Reply
|
|
|
Author:
sum (FL)
down here dirt IS mostly sand so there is no big difference. The top 6-12 inches are top soil and the rest is mostly sand. I excavated sand, I put back sand.
|
|
Post Reply
|
|
|
Author:
bernabeu (SC)
when you backfill step 1
layer just below top of pipe
wet
TAMP THOUROUGHLY around pipe to 'embed' pipe in fill
(use a 2x4 vertically by hand as you would use a calking chisel on a poured lead joint)
then
backfill to desired grade
pipe will never shift 'downwards'
==============================================
"Measure Twice & Cut Once" - Retired U.A. Local 1 & 638
|
|
Post Reply
|
|
|
Author:
sum (FL)
bernabeu, I pretty much follow the same steps, added dirt close to the top of the pipe, tap around the dirt to get it right around pipe. Use garden hose to wet the whole thing down, I left it like that for a day or two to let rain do more work, as the trench is right under the drip edge of the roof, so when it rains, sheets of water pour into the trench. Then I back fill more, and more.
I also put bricks under every fitting to get it to the grade I wanted to start with, so that should also help with prevent the settlement.
|
|
Post Reply
|
Please note:
- Inappropriate messages or blatant advertising will be deleted. We cannot be held responsible for bad or inadequate advice.
- Plbg.com has no control over external content that may be linked to from messages posted here. Please follow external links with caution.
- Plbg.com is strictly for the exchange of plumbing related advice and NOT to ask about pricing/costs, nor where to find a product (try Google), nor how to operate or promote a business, nor for ethics (law) and the like questions.
- Plbg.com is also not a place to ask radiant heating (try HeatingHelp.com), electrical or even general construction type questions. We are exclusively for plumbing questions.
Search for plumbing parts on our sponsor's site:
Special thanks to our sponsor:

|


