 
Over 698,000 strictly plumbing related posts
Plumbing education, information, advice, help and suggestions are provided by some of the most experienced plumbers who wish to "give back" to society. Since 1996 we have been the best online (strictly) PLUMBING advice site. If you have questions about plumbing, toilets, sinks, faucets, drains, sewers, water filters, venting, water heating, showers, pumps, and other strictly PLUMBING related issues then you've come to the right place. Please refrain from asking or discussing legal questions, or pricing, or where to purchase products, or any business issues, or for contractor referrals, or any other questions or issues not specifically related to plumbing. Keep all posts positive and absolutely no advertising. Our site is completely free, without ads or pop-ups and we don't tract you. We absolutely do not sell your personal information. We are made possible by: 
|
|
Author:
sum (FL)
Back in June, I started a project to correct what a plumber via a sewer camera told me about a belly in my line, which he said was the reason for me having two blockages over the past six years. So after my tenants moved out, I decided to dig up the pipe myself and see what's going on.
I started a thread then seeking advice:
[www.plbg.com]
Unfortunately, the excavation, as well as dealing with the massive roots before I even got to the pipes, injured my back. I couldn't bend down, squat, lift much of anything let alone a shovel for a while. So I had to stop the project and do other "standing up" things like painting, patching walls, hanging lights etc...until my back stop tensing up.
My back feels better now so I am getting back to it. As I have stated in my previous thread, the "belly" they found was actually in the series of fittings where they made a 90 degree turn on the main line. There, whoever did the installation had to raise the pipes to meet the 2" CI, whatever he did he caused those fittings to be lower.
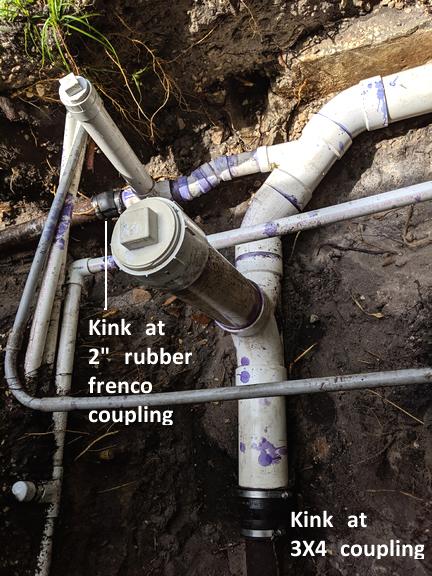
I did a bit more excavation back to the house to expose the connection to the 3" CI. Turned out the pipe inside the house is 3", then as it exits the house they made a cut, to connect to 4" PVC with a 3X4 rubber fernco coupling (there is a kink at that connection), then it runs through a few fittings to make a 90 degree turn, in the middle of those fittings is a 4X4X2 wye, which is connected to an old 2" CI kitchen drain through a series of offsets and a 2X2 fernco coupling (there is also a kink at that connection), after the 90 degree turn it is a straight shot but there are a few chips and cracks I need to fix due to my using the shovel to cut roots and hitting the pipes.
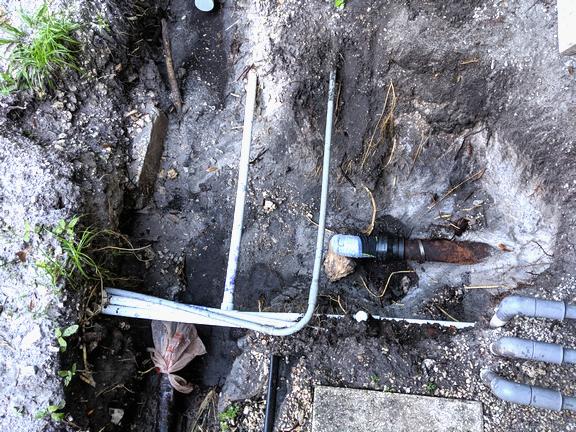
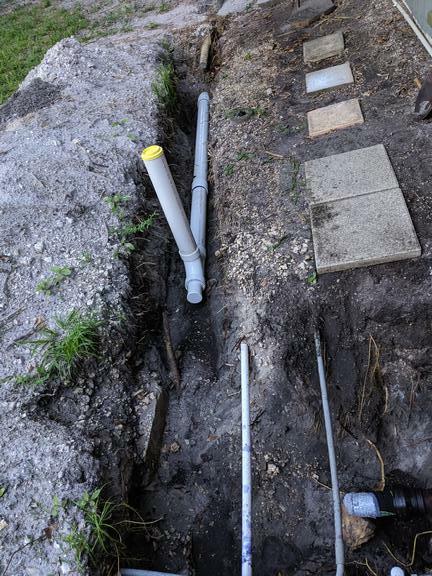
Here is a picture showing the newly excavated trench showing all the pipes at varies angles. As you can see, I also have 1" irrigation pipes and 1/2" electrical conduits in the way. So it's quite busy.


The next two pictures show the kinks at the main 3"CIX4"PVC coupling as well as the 2"CIX2"PVC coupling. I don't know if you can tell clearly but there is a kink vertically at the 3" and at the 2" the kink is more like a horizontal offset PLUS a kink in grade. They obviously had a real hard time to make it work. On top of that I found out one of the 4" fitting (a street 45) was completely loose all these years.

So yesterday I cut the pipes out and replaced a stretch of the 4" PVC pipe.
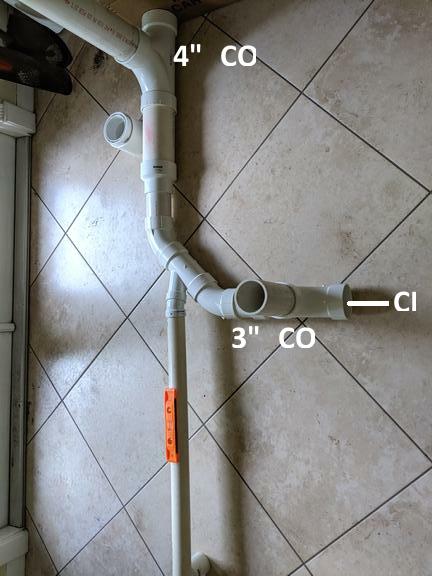
I put in a bushing at the 4" and from there to the 3" CI I am going with just 3" pipes and fittings to make things a bit easier. I will have a 3" CO right after the connection to the 3" CI, a series of fittings to make the 90 degree turn, then connect to the 4" with a 4" CO. The 3x2 wye will be rolled up to meet the 2" CI. I may cut the 2" CI as far back as 10' to replace as much of that as possible.
Something like this?
I find it very difficult to work the fittings and the 3" CI connection with the irrigation and electrical conduits in the way, and have been debating whether I should cut them to allow better access. Thoughts?
I am unable to remove the rubber fernco from the CI. It's stuck. The PVC end came out with little resistance, but the CI seem like it's glued together. Shouldn't it come out pretty easy? Is it possible it was really glued by the original installer? Any ideas on how to free it? Use a razor blade to slice it up? Right now I have a water bottle wrapped in a couple of old socks to seal it LOL.

Edited 4 times.
|
|
Post Reply
|
|
|
Author:
steve (CA)
The rubber often times bonds to the rough rusty exterior and needs to be cut off.
|
|
Post Reply
|
|
|
Author:
sum (FL)
OK I will cut it off, hopefully there is a clean and even CI edge under that rubber.
|
|
Post Reply
|
|
|
Author:
sum (FL)
I cut the 3x4 rubber coupling off.
Now I need to decide what coupling to use to connect the 3" PVC to 3" CI. I have two couplings to choose from:

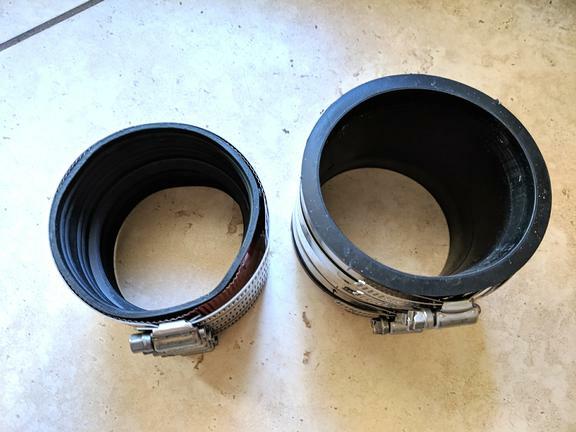
They are both rated for buried applications, on the left is a 4 band mission coupling, and on the right is a Fernco strongback rubber coupling.
Personally I think the one on the left is easier to install, I will just put it on the PVC end, roll half of it back and when I align the two ends just unroll and tighten the four hex screws to 80#-in.
The Fernco rubber coupling I always had trouble installing because you need to lubricate the pipes and slide the entire piece on one pipe then once align push half of it onto the other pipe, and being the cast iron is sixty years old with a rough and rusty outside even if I sand or file it smoother it's going to be a struggle.
Which one should I use?
|
|
Post Reply
|
|
|
Author:
bernabeu (SC)
try the Fernco
wire brush the CI
lube it with ordinary butter, yes BUTTER like you put on your toast
slide on the Fernco, tighten ONE clamp
you know what to do next .............................................

==============================================
"Measure Twice & Cut Once" - Retired U.A. Local 1 & 638
|
|
Post Reply
|
|
|
Author:
sum (FL)
the CI pipe is really rough it has some nodules on the outside. I may have to put an angle grinder on it to smooth it off.
My biggest worries are those kinks at the existing connections that I removed. I have a feeling nothing will align perfectly straight either horizontally or vertically. I know the pipe exiting the house is exiting the house point south, but the pipe after the first 90 was running S 82 E. On top of that the original rubber coupling was kinked vertically by good 5 degrees with the PVC, both at the 3X4 connection and at the 2X4 connection. If they do not line up well, I may have a problem.
If the PVC pipe is not perfectly aligned with the CI, suppose I drive an EMT conduit deep into the soil to nudge the pipe into better position (leaving it permanently there to take off the strain at the rubber coupling), is this something I should do or a bad practice?
|
|
Post Reply
|
|
|
Author:
bernabeu (SC)
heat the PVC with a heat gun CAREFULLY and you can get 'slight' bends as required BEFORE installing and/or entrenching same
good luck
OR
at YOUR discretion CHEAT and use an unshielded coupling assuming there will be NO STRAIN - bed said joint in sand
==============================================
"Measure Twice & Cut Once" - Retired U.A. Local 1 & 638
|
|
Post Reply
|
|
|
Author:
packy (MA)
sum, i don't think a little 'kink' in the rubber coupling will do any harm.
did you take it apart and have a look at the inside?
if so, was there an accumulation of debris? i'll bet there was not.
|
|
Post Reply
|
|
|
Author:
sum (FL)
Packy there wasn't debris but the inside of the cast pipe is also quite rusty and not very smooth.
|
|
Post Reply
|
|
|
Author:
Palm329 (VA)
Could the “belly” as well as both fernco kinks have all been caused by post-installation settling of the pvc at the double 45 bend? It almost appears to me like if u somehow jacked up that section it would all straighten out.
|
|
Post Reply
|
|
|
Author:
sum (FL)
No. They were caused by poor installation.
They had a hard time matching the grade of the 2" CI pipe from the kitchen. They had to twist the fittings to make that work which caused the belly. Also the 90 turn is not really 90, but around 83 degrees, so one of the 45 degree elbows were glued at a skew. It came apart on its own.
|
|
Post Reply
|
Please note:
- Inappropriate messages or blatant advertising will be deleted. We cannot be held responsible for bad or inadequate advice.
- Plbg.com has no control over external content that may be linked to from messages posted here. Please follow external links with caution.
- Plbg.com is strictly for the exchange of plumbing related advice and NOT to ask about pricing/costs, nor where to find a product (try Google), nor how to operate or promote a business, nor for ethics (law) and the like questions.
- Plbg.com is also not a place to ask radiant heating (try HeatingHelp.com), electrical or even general construction type questions. We are exclusively for plumbing questions.
Search for plumbing parts on our sponsor's site:
Special thanks to our sponsor:

|