 
Over 698,000 strictly plumbing related posts
Plumbing education, information, advice, help and suggestions are provided by some of the most experienced plumbers who wish to "give back" to society. Since 1996 we have been the best online (strictly) PLUMBING advice site. If you have questions about plumbing, toilets, sinks, faucets, drains, sewers, water filters, venting, water heating, showers, pumps, and other strictly PLUMBING related issues then you've come to the right place. Please refrain from asking or discussing legal questions, or pricing, or where to purchase products, or any business issues, or for contractor referrals, or any other questions or issues not specifically related to plumbing. Keep all posts positive and absolutely no advertising. Our site is completely free, without ads or pop-ups and we don't tract you. We absolutely do not sell your personal information. We are made possible by: 
|
|
Author:
BrettMet (MI)
This is my first time posting, and I’m excited to have this as a resource.
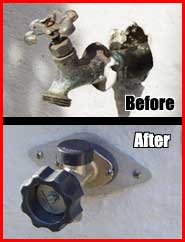
My outside spigot was dripping and the handle spun and spun without turning off, so I turned off the supply line inside the house, and struggled with removing the sillcock. Actually, I was only able to remove the core piece from it, leaving the spout in place, since it’s mounted to the cedar siding underneath the vinyl siding. (Photo A Link Below)
I went to the local home improvement store and picked up 8”, 10”, and 12” replacements, intending to remove the guts from the one whose length best matched the removed piece. Well, it turns out that the long copper piece on the inside of the pipe was 8.5”, which I cannot find anywhere. Noticing a bit of sloppy solder suggested to me that the 1983 builders may have custom made this one. Why else would there be an 8.5” piece, which I cannot find anywhere else?
To add an additional layer of challenge, accessing the finger-tightened joiner (sorry, I don’t know the correct terminology) is nearly impossible, since it’s up between a couple basement joists, and access is limited by a hot water line, cold water line, gas line, and ductwork. There is no way to get enough leverage to loosen up the inside pieces to pull through the outer wall.
So, I was thinking about cutting the copper pipe inside, so that I may remove it through the outer wall hole, and then using Sharkbite and maybe a few inches of new copper pipe (or PAX or PVC) when I bring the new sillcock in from the outside.
This has been a DIY headache for me, but fortunately it’s summertime, and I have time to work on it. Also, it’s not like we’re talking about the kitchen sink, which gets a lot of use.
Any advice anyone could give would be appreciated, since I cannot afford to bring in a professional. Thank you.
PHOTO A
[photos.app.goo.gl]
Item A is the core guts piece that was removed from the wall. It’s 8.5” long, and had messy solder at the left, under the “IG-88 head.”* It’s pictured next to Item B, which is a full replacement sillcock, only sold as 8”, 10”, and 12”.
*That’s a Star Wars reference, and my best way to describe what I’m seeing.
PHOTO B
[photos.app.goo.gl]
This photo shows (from top to bottom) the old removed guts; a tape measure; the new removed guts; and the outer pipe and spout that held the new removed guts. 10” on the new one is the distance from the rib just to the right of the handle assembly down the shaft to the neck just shy of the IG-88 head, hidden on this new one by the rubber skirt.
PHOTO C
[photos.app.goo.gl]
This shows the sloppy solder work, suggesting to me that perhaps the piece was custom-cut and put back together. Why? I have no idea. Ask the builder and plumber from 1983.
VIDEO
Low-quality video that shows how tight the space is. I’m not optimistic about being able to loosen the hand-tightened and taped pieces deep in the wall.
[photos.app.goo.gl]
MORE PHOTOS
[photos.app.goo.gl]
I snapped away to show what I’m dealing with inside the house: very tight spaces blocked by gas, hot water, cold water, electric, and HVAC.
|
|
Post Reply
|
|
|
Author:
bernabeu (SC)
you can NOT merely 'pick up' replacement parts of the appropriate length
you need to buy the EXACT same brand and length if you are going to 'cannibalize'
or
the exact 'rebuild kit' for the valve you have
locate the brand and model number from the handle / tag of the one installed and proceed from there
there are few to NO INTERCHANGEABLE parts between manufacturers of plumbing fixtures
==============================================
"Measure Twice & Cut Once" - Retired U.A. Local 1 & 638
|
|
Post Reply
|
|
|
Author:
BrettMet (MI)
Thank you for the prompt reply. I'm loving this resource!
As for parts involved, they all look identical, with the exception of length. Even the handles are the same.
Are you suggesting that I just replace everything, and reconnect inside? If so, I run into trouble freeing up the current (old) fixture that starts outside the building, and comes in. Thank you again.
|
|
Post Reply
|
|
|
Author:
packy (MA)
brett, the difference in length may be because one sill cock has a vacuum breaker making the insides slightly longer?
you are going to have a messy job removing the old sill cock if it is attached from under the siding.
might be easier if you put it back together and let it stay.
just shut the inside valve cut the copper out of the way leaving enough good copper to slide on a sharkbite to adapt to pex. pex is the same outside diameter as copper so that should not be a problem.
then drill a new hole somewhere else and loop some pex around to tie into a new sill cock.
you will have to attach the new pex to the new sill cock.
they come with a sharkbite end.


|
|
Post Reply
|
|
|
Author:
BrettMet (MI)
Packy,
Question A:
When you wrote "might be easier if you put it back together and let it stay," are you suggesting that I just keep that old one in place, unused, and then tell the next owners 10-20 years down the line that one of those is dead and the other works?
Question B:
I think I understand what you're suggesting with the PEX (ha! I had written PAX once before--the forerunner of the ION TV network). I could just put a new full sillcock unit immediately next to it, between the next set of joists, and go from the original copper supply line --> Sharkbite --> PEX --> Sharkbite #2 --> new sillcock? (I'm not actually sure I understand how the PEX would connect to the new sillcock, but I could figure that out standing in the aisle of the home improvement store. I'm assuming that it's going to take Sharkbite #2, but perhaps I'm mistaken.)
Thank you for your assistance.
Brett
|
|
Post Reply
|
|
|
Author:
packy (MA)
answer A : you either remove it, patch the siding and install the new one OR just leave it and drill for a new one.
answer B : look again at the top picture i posted. the pex just slips into the end of the sill cock which is sharkbite.
so..
existing copper tube ...
sharkbite 90 onto copper...
piece of pex slides into pex 90...
make the pex plenty long so you can come out of the 90, go right past the new sill cock and make a gentle 270 deg bend back into the sharkbite end of the new sill cock with no stress on the pex or you.
hey, the pex is cheap so it doesn't matter which way you choose but making a big loop most times makes life so much easier.
|
|
Post Reply
|
|
|
Author:
BrettMet (MI)
I think I understand. Your pictures just came up as thumbnails, and I couldn't view them, but your description was accurate enough that I think I'm with you. Thanks so much!
Edited 1 times.
|
|
Post Reply
|
|
|
Author:
bernabeu (SC)
an actual plumber with the proper tools would simply replace the existing sill-cock in under an hour
simple job
however
spend almost as much and DIY with a dead item remaining next to a new replacement
(removing the two 'mounting' screws from under the siding is almost a non issue IF, repeat IF, one has construction service experience)
==============================================
"Measure Twice & Cut Once" - Retired U.A. Local 1 & 638
|
|
Post Reply
|
|
|
Author:
packy (MA)
removing the screws may be simple but pulling the mounting flange thru a hole made for pipe size requires cutting the vinyl siding.
|
|
Post Reply
|
|
|
Author:
bernabeu (SC)
@ packy,
one cuts away the mounting flange with skillful use of a sawzall or other reciprocating saw and lets the pieces fall away behind the siding
OR (if you foul up)
one installs:
(in good humor) 
==============================================
"Measure Twice & Cut Once" - Retired U.A. Local 1 & 638
|
|
Post Reply
|
Please note:
- Inappropriate messages or blatant advertising will be deleted. We cannot be held responsible for bad or inadequate advice.
- Plbg.com has no control over external content that may be linked to from messages posted here. Please follow external links with caution.
- Plbg.com is strictly for the exchange of plumbing related advice and NOT to ask about pricing/costs, nor where to find a product (try Google), nor how to operate or promote a business, nor for ethics (law) and the like questions.
- Plbg.com is also not a place to ask radiant heating (try HeatingHelp.com), electrical or even general construction type questions. We are exclusively for plumbing questions.
Search for plumbing parts on our sponsor's site:
Special thanks to our sponsor:

|