 
Over 698,000 strictly plumbing related posts
Plumbing education, information, advice, help and suggestions are provided by some of the most experienced plumbers who wish to "give back" to society. Since 1996 we have been the best online (strictly) PLUMBING advice site. If you have questions about plumbing, toilets, sinks, faucets, drains, sewers, water filters, venting, water heating, showers, pumps, and other strictly PLUMBING related issues then you've come to the right place. Please refrain from asking or discussing legal questions, or pricing, or where to purchase products, or any business issues, or for contractor referrals, or any other questions or issues not specifically related to plumbing. Keep all posts positive and absolutely no advertising. Our site is completely free, without ads or pop-ups and we don't tract you. We absolutely do not sell your personal information. We are made possible by: 
|
|
Author:
Palm329 (VA)
Sorry for the deluge of plumbing questions but I’m about to break ground (literally) on this basement refinish and it seems I am going to have to cut the water off to my whole house at least all day... so I want to be certain I know exactly what I am doing before I start...
I have a situation where I have 3/4 copper main lines (hot & cold) running along the basement ceiling at the edge of the building. Off these “mains”, lines branch off to the kitchen, each bathroom, etc. Of-note, these pipes are a few inches above ground level outside the brick & block wall.
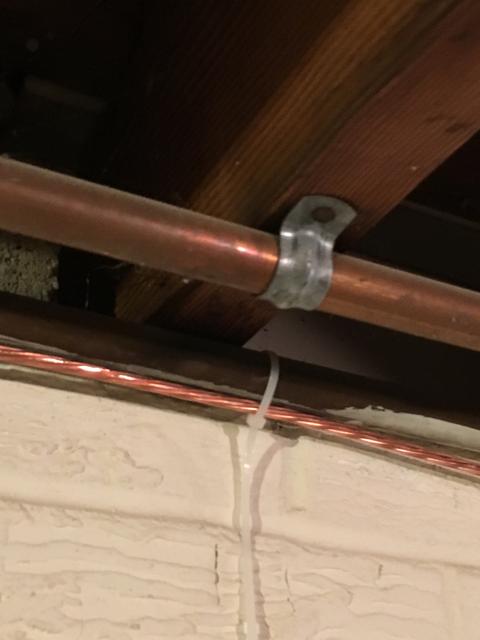
Now, because this is right at the edge, I am faced with a situation. I need to frame out a 2x4 studded wall right where these pipes are. So I have a plan to cut out these pipes along this wall... then frame out the wall... then notch the inside-facing sides of the 2x4’s and re-install new 3/4” type L pipes.
One issue is I need to cut everything out (so no water), then frame the whole wall, then notch, before I can even begin soldering together my pipes. So I am kind of worried if things don’t go well I’m not going to be able to stay at my home.
So I have a few questions:
1. Is this the correct plan of action?
2. For the notching, what spacing and how far down from the ceiling should these pipes run? Hot on top, cold on top, or it doesn’t matter?
3. I’m planning on putting them on inside of wall. Insulation will later be installed in stud bays. Do I need to be concerned about freezing or should this work?
I know I’ll need some sort of nailer plates installed over the notches for the dry wallers.
|
|
Post Reply
|
|
|
Author:
srloren (CA)
Can't you frame the wall with the copper in place. There must be a way rather than cutting out the copper. Why borrow problems? Can you post more photos so we are sure of what the issue is?
|
|
Post Reply
|
|
|
Author:
sum (FL)
Not sure I follow your problem description 100%.
But I would:
(1) Find a convenient strategic spot to cut the cold and hot pipes so that they are not in the way of your new wall and where you can extend your new piping.
(2) Cut out old pipes and use temp sharkbite or John Guest caps on the cut ends so you can restore water to the house or at least part of the house while you do the rest. That takes a lot of the pressure off.
(3) frame your wall.
(4) install new piping.
(5) remove temp caps and make the final joint to new piping.
Edited 1 times.
|
|
Post Reply
|
|
|
Author:
packy (MA)
freezing is always a concern up here on cape ann.
if you have temps around zero where you are then you need to be extra careful about concealed pipes in an outside wall, especially if that wall faces north.
|
|
Post Reply
|
|
|
Author:
Palm329 (VA)
Check this out, hope it helps visualize what I’m thinking to do:
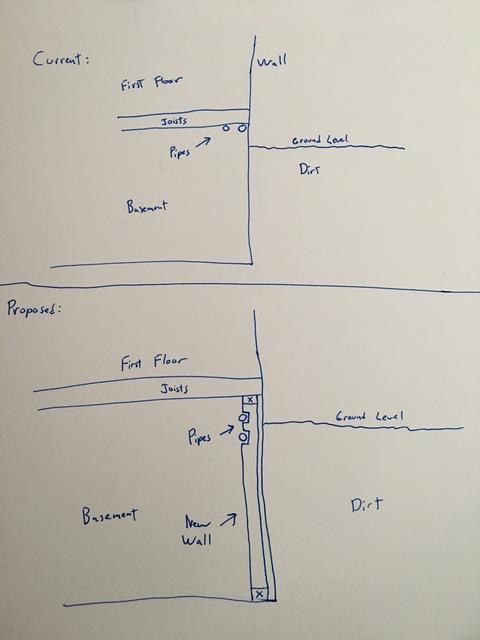
If I do this, any particular requirements or tips with regards to notch depth and spacing?
|
|
Post Reply
|
|
|
Author:
packy (MA)
since the wall is only there to hold the sheet rock and does not support any weight above. you can make the notch 1 1/2 inches deep and slide foam insulation all along the pipes while they are out of place.
hanging won't be a problem because the pipes will be smushed together and also smushed into opening by the sheetrock.
|
|
Post Reply
|
|
|
Author:
Palm329 (VA)
Great thanks for that advice. I had forgotten about the insulation.
In a couple of spots, I need to “tee” off these pipes up and then across the basement up inside a joist bay...
Thinking it over as since these pipes will now be directly above one another, how to I bring the bottom pipe up? I suppose I’ll need to angle the “tee” a bit, the being it vertical with a 45 behind the top pipe?
|
|
Post Reply
|
|
|
Author:
sum (FL)
Looking at your diagrams, I am not sure you really need to reposition your pipes.
There may be other reasons you have not mentioned, but at least to me, the only reason you are repiping these lines is to get them out of the way so your new wall's top plate can attach to the bottom of joists?
Your new wall is not load bearing in a structural sense. It does not need to run all the way to the joists. It can run to say 2" to 3" below the joists and your top plate does not need to meet the joists. That gives you a cavity at the top of the wall for the existing pipes, or if you wish you can repipe the outside one if it sticks too far out. Your new wall can be attached to the masonry wall at the top with L brackets or concrete screws, there are a variety of other carpentry options to do that. That way your wall framing and piping are two projects that one does not need to depend on the other and no need to turn water off while you frame the wall. The only issue with that is your new wall sheetrock will not have any wood to attach to right at the top. Depends on how high you take the top plate you may not need that, or you can attach a strip of 1X2 or 2X2 to the underside of the joists flushed with your new framing for that.
Even if you decide to cut all old pipes out for the wall having an unobstructed space above the top plate for the pipes (and possibly electrical, or CAT6, or whatever) may still be preferred over notching and drilling across all the studs.
That also solves your tee branch issue because your pipes do not need to be directly above each other requiring you to do offsets.
Edited 3 times.
|
|
Post Reply
|
|
|
Author:
Palm329 (VA)
Sum great points, thank you. You are correct, the reason behind the repositioning is so I can get a nice solid attachment point between the wall and the joists... without the more complex cleating otherwise required.
A secondary goal is the completion of replacing all the plumbing in my house. I’ve done the bathrooms and kitchen already as I refreshed them.
I think I am overthinking this. I went back downstairs and measured the run last night. It’s only about 16’ of distance this arrangement will be required. So yes I’ll lose my water for a day, but, it might only be a handful of soldered joints.
And from my experience in this house... if I can get all the water out of the pipes, the soldering is easy... when I have a slow drip that keeps making steam at my joint... near impossible...
|
|
Post Reply
|
|
|
Author:
sum (FL)
Either way would work. I personally prefer to build a wood frame interior wall on the ground and nail in all the studs then raise it in place. This is going to be a challenge if your joists and floor are not totally perfect requiring you to leave a slight gap which you have to shim under many joists. Unless you attach the bottom and top plates separately first, which invites an alignment challenge but with modern day lasers not a big deal, but then each stud could be just slightly different in length.
For water trapped in pipes get a shop vac. You need a longer hose if the vac is on the ground and you need to suck out water 8' above. I have tried to hold a shop vac with one hand, the hose in the other, on the ladder and it's kind of clumsy.
Edited 1 times.
|
|
Post Reply
|
|
|
Author:
LI Guy (IN)
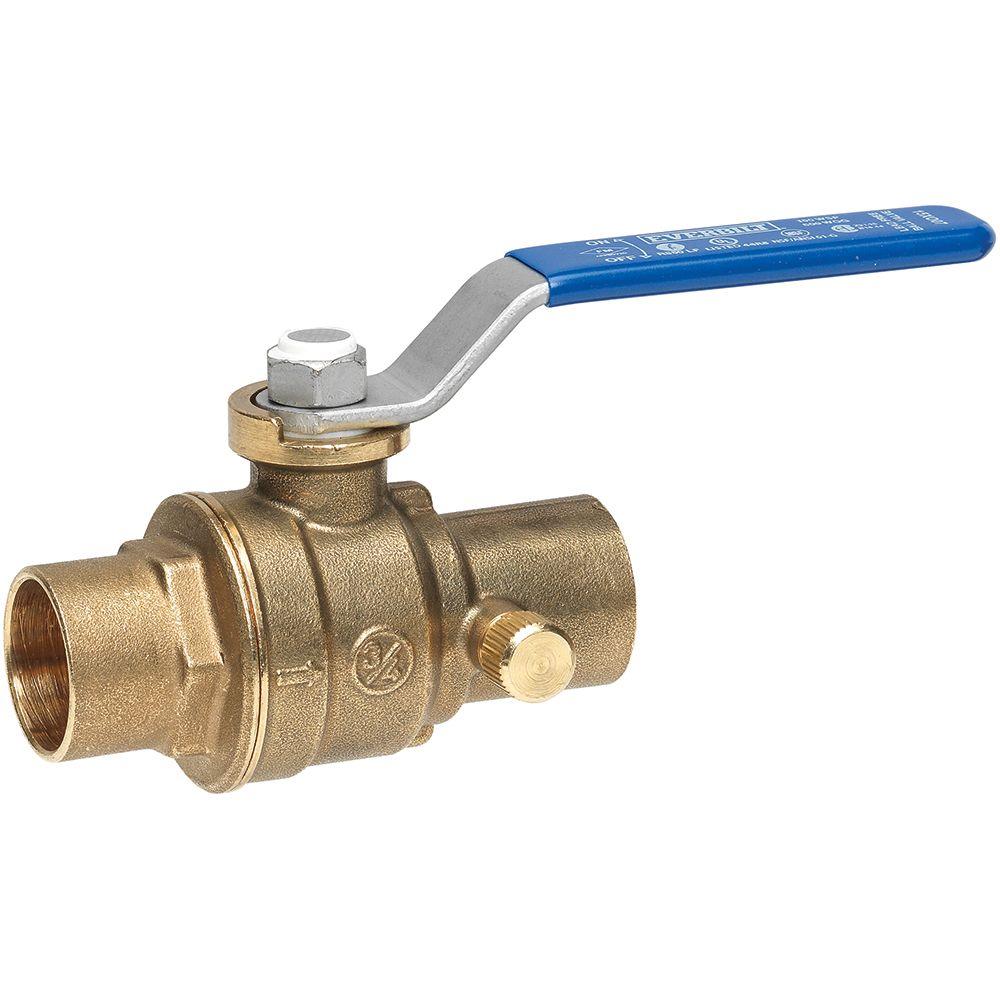
Now that I have moved my kitchen sink as part of the remodel, I have officially re-piped 100% of my hot, cold, and drain lines, with the exception of about 10' coming off the meter. I have been dividing the plumbing runs into sections like upstairs, 1/2 bath, kitchen, etc., and installing ball valve shutoffs.
While I don't technically need shutoffs in the basement since I have them at the fixtures, I am using the kind with the built in drains. So for example, I can shut off the kitchen and drain the water from just those pipes making any future soldering easy without draining the whole system. If I have to work on the trunk lines in the basement, shutting off the upstairs keeps all that water from draining back. Full port valves don't restrict flow so no loss of capacity.
To your current issue, I keep a 2' section of 1/4" tygon tubing in my plumbing kit and use that to empty pipes. Stuff the hose in the pipe, put your finger on the end, remove, drain, repeat. Will get the water back far enough to solder, but if you have a persistent drip a sharkbite is the only way to go.
- - - - - - -
Not a plumber by trade but a fierce DIYer
Edited 2 times.
|
|
Post Reply
|
|
|
Author:
packy (MA)
LI Guy, good advice but the valve you picture is not good.
under the handle there MUST be a packing nut so in the future when it drips you can tighten the nut or if necessary repack the stem.
valve with nut pictured below. (see the difference?)
additionally, if there is a tiny leak on your valve, the steel handle will rust making repairs practically non-existent.

|
|
Post Reply
|
|
|
Author:
sum (FL)
Packy, is it necessary to take apart the guts of a ball valve when soldering so the heat won't damage any non metal parts?
|
|
Post Reply
|
|
|
Author:
Palm329 (VA)
LI guy I’ll keep that trick in mind if I run into the water drip issue.
I’ve also read something about jamming bread into the pipe, but I have never had the guts to do that.
As far as building the new wall... been thinking about it more and I’m thinking the best thing will be to simply pre-drill each stud with offset holes, then to insert copper thru before standing it up and installing it... then I can just solder in the “tees” and come up and across the house inside the joist bay... therefore solving all issues and totally hiding all the pipes once the drywall gets installed.
|
|
Post Reply
|
Please note:
- Inappropriate messages or blatant advertising will be deleted. We cannot be held responsible for bad or inadequate advice.
- Plbg.com has no control over external content that may be linked to from messages posted here. Please follow external links with caution.
- Plbg.com is strictly for the exchange of plumbing related advice and NOT to ask about pricing/costs, nor where to find a product (try Google), nor how to operate or promote a business, nor for ethics (law) and the like questions.
- Plbg.com is also not a place to ask radiant heating (try HeatingHelp.com), electrical or even general construction type questions. We are exclusively for plumbing questions.
Search for plumbing parts on our sponsor's site:
Special thanks to our sponsor:

|