 
Over 698,000 strictly plumbing related posts
Plumbing education, information, advice, help and suggestions are provided by some of the most experienced plumbers who wish to "give back" to society. Since 1996 we have been the best online (strictly) PLUMBING advice site. If you have questions about plumbing, toilets, sinks, faucets, drains, sewers, water filters, venting, water heating, showers, pumps, and other strictly PLUMBING related issues then you've come to the right place. Please refrain from asking or discussing legal questions, or pricing, or where to purchase products, or any business issues, or for contractor referrals, or any other questions or issues not specifically related to plumbing. Keep all posts positive and absolutely no advertising. Our site is completely free, without ads or pop-ups and we don't tract you. We absolutely do not sell your personal information. We are made possible by: 
|
|
Author:
steve (CA)
Cut the 90* next to the hub. The band will seal(after cleaning OD of the 90*).
|
|
Post Reply
|
|
|
Author:
packy (MA)
as steve says, cut close to the hub. there should be plenty of room for the mission coupling. even if you use a 4 band type.
if you do decide to smash the hub, use 2 hammers. one below to keep the hub from moving.
even after removing the hub, there will be a raised bump on the end of the pipe.
|
|
Post Reply
|
|
|
Author:
sum (FL)
Packy and steve, I think I will cut it downstream of the hub first, so all I have is the hub. Then I will try to remove the hub if I can. If I can't, then I will re-cut the elbow at the hub and make the connection there instead.
About freeing the hub from the end of the elbow...do I have to smash it? If I do how do I smash the hub but risk not smashing the pipe inside of it?
It's held together by lead right, lead is soft right. If I only have a cut stub of hub on it, can I put a plumbers wrench on the hub and twist it off or try to turn it back and forth a little and wiggle it out?
Or better to use a grinder to cut the length of the hub say 80% then try to chisel it open?
|
|
Post Reply
|
|
|
Author:
LI Guy (IN)
I would listen to Steve and Packy. If you start messing with the hub and crack the elbow trying to get the hub off, plan B may not be an option if you crack the elbow further upstream than the edge of the hub. You're making the job more complicated than it needs to be.
- - - - - - -
Not a plumber by trade but a fierce DIYer
|
|
Post Reply
|
|
|
Author:
steve (CA)
As packy stated, the 90* will have a raised ring on the end of it that will need to be removed before using the band coupling. Save the extra cuts and cut the 90* next to the hub. To remove the hub, you should cut all the way through it, parallel with the flow, not just 80%. Limit the hammering/chiseling.
|
|
Post Reply
|
|
|
Author:
sum (FL)
I won't be doing anything to cause any accidental crack. I will only be wasting a bit of time but no way I would risk further damages. No worries.
|
|
Post Reply
|
|
|
Author:
Palm329 (VA)
Sum,
Unrelated question - is that a vintage porter cable reciprocating saw in the photo??
I kinda see the silver and black colors.
If so that’s cool it’s still running. That brand used to be solid before it went offshore.
|
|
Post Reply
|
|
|
Author:
sum (FL)
yes Palm329, it is a Porter Cable recip. saw. I typically use a cordless Milwaukee nowadays, but with thick cast metal I want the extra juice so I took out my corded PC.
That was when PC was a good tool brand, before Stanley Black & Decker turned it into crap!
|
|
Post Reply
|
|
|
Author:
packy (MA)
sum, I have always assumed the lip is there to keep the oakum from going in too far when packing the joint.
although I would venture a guess that the are as many joint made with bald pipe as there are with fittings containing a lip.
1) you pack oakum
2) you pour molten lead
3) you caulk the lead when it has solidified.
as for power tools, I watched a very interesting video on youtube about who owns which power tool companies.
|
|
Post Reply
|
|
|
Author:
sum (FL)
I thought bald pipes came along later when no hub coupling were common? I didn't know the lipped and bald pipes are available then. I also didn't know the lip is almost an inch wide.
so I need a wire wheel to clean up the cut end, and smooth off the edge so it won't nip the connector coupling.
Do I need some sort of grease or water based lubricant to help make the seal between old cast iron and the neoprene or the cranking down of the shielded clamp is enough?
|
|
Post Reply
|
|
|
Author:
LI Guy (IN)
That's what I would assume too, Packy, the lip is there to keep you from packing oakum into the pipe. So a length of pipe is manufactured with a lip on the male end, what about when you have to cut to length? Did they make a sleeve or ferrule you could slip on to cut pipe or did you just pack it bald?
This is all interesting to me, having just removed our CI soil stack last year, God forbid there was an explosion that leveled the house that pipe would survive in one piece LOL....those lead joints were solid!
- - - - - - -
Not a plumber by trade but a fierce DIYer
|
|
Post Reply
|
|
|
Author:
sum (FL)
I doubt it would make a difference having the lip or not to pack oakum. The real pros would do it the same way not to rely on that lip anyways. May be you roll the oakum together then compress it a bit before pushing it into the joint tight.
|
|
Post Reply
|
|
|
Author:
packy (MA)
most fittings have the lip on the end. pipe does not.
furthermore, (way back when) we used to buy double hub lengths of pipe to keep the wasted ends to a minimum.

|
|
Post Reply
|
|
|
Author:
sum (FL)
Curious, could I have removed the hubbed end much easier using a torch to melt the lead?
I still haven't seen the mythical upside down lead joint.
|
|
Post Reply
|
|
|
Author:
packy (MA)
yeah, especially since you were outside. it makes a bunch of smelly smoke.
if you did melt off the hub, you would still have the lip to deal with so are better off just sawzalling the pipe right close to the hub.
|
|
Post Reply
|
|
|
Author:
sum (FL)
OK that makes sense. I just wanted to preserve as much of the straight section of the elbow as possible. Looks like by doing what I did I gained one inch LOL.
I found some corrosion around the pipe's last two inches or so that a wire wheel on a drill or aluminum oxide sand cloth would not take off. So I took out an angle grinder to smooth the outside of the pipe. As the angle grinder grind away it blasted dirt in my face. Now I am ready to make the connections.
How flexible are 2" sch40 PVC pipes? I wonder if I can flex it 5 degrees over 20 feet?
|
|
Post Reply
|
|
|
Author:
packy (MA)
5 degrees over 20 feet in the hot FL sunshine is fine.
plus, the sleeved rubber coupling will also give a little with no problem.
|
|
Post Reply
|
|
|
Author:
sum (FL)
I got the kitchen line reconnected. Now I need to extend the inlet of the WYE further up and around the corner.


Should I put some sort of butter/bacon grease/petroleum jelly or whatever :LOL: to seal the neoprene to the outside of the CI better?
Edited 1 times.
|
|
Post Reply
|
|
|
Author:
PlumberManDan (IA)
Better plumbing than some "Professional" plumbers I have seen lately. You get a "10" Sum.
 PlumbCat TM 2003 PlumbCat TM 2003
Plumbermandan
Edited 1 times.
|
|
Post Reply
|
|
|
Author:
packy (MA)
sum, I tighten the 60 in pound screws with my 60 in pound wrench and then using my drill driver with various settings. I fool around until I get the drill driver to stop turning at the 60 inch pound tightness.
usually my Ryobi 18V drill driver needs to be set at #22 on the chuck.
so, if #22 is 60 then put a 3/8 socket adapter with a 3/8 socket into the chuck, turn the setting up a couple of numbers and you should be close enough to 80 inch pounds to make a tight, leak free joint
|
|
Post Reply
|
|
|
Author:
sum (FL)
Packy, great idea! That should work! Bravo!!!
It should seal good. I already put a grinder on the ends of the CI pipe and smooth off the last three inches so no bumps all the way around. Got sand blasted all over my face with the grinder sitting low to the ground with sand all around!
Edited 2 times.
|
|
Post Reply
|
|
|
Author:
packy (MA)
just leave the existing vent and put an upside down "Y" with a street 45 looking down at the new sanitarty tee. put it 6 inches higher than the top of the washer standpipe.
|
|
Post Reply
|
|
|
Author:
sum (FL)
oops packy too late I demoed all the old piping that leads to the 3" line to the gravel pit this weekend. I haven't had a chance to plumb in the new pipes yet. I wonder if I could use 1.5" vent above the sanitary tee.
|
|
Post Reply
|
|
|
Author:
steve (CA)
1.5" vent is all that's needed.
|
|
Post Reply
|
|
|
Author:
sum (FL)
I had some back pain this week so didn't do much.
Finally went over this morning and put in a few more pieces. Now I have the lower sanitary tee glued in. The rest above it haven't been glued. I finished the p-trap and standpipe on the inside.
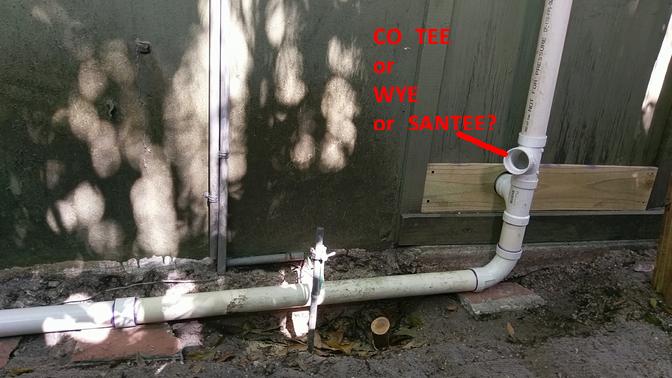
The street sanitary tee hasn't been glued in. Initially I had a CO fitting there, but thought a santee may be better for directing a snake down. Then I thought, why not a wye? I have all three fittings, along with a female adapter for the CO cover. Which one should I use?

All I have left is the vent to go up which is the easiest part. I open the washing machine valve and stuck the hose down the pipe and ran hot water for 15 minutes no leak in any joint including the no-hubs way downstream.
|
|
Post Reply
|
|
|
Author:
vic (CA)
Thank you Sum for sharing all of this with us.
Also, I hope you have no more backpain. 
|
|
Post Reply
|
|
|
Author:
sum (FL)
Thanks vic! Too much digging and bending over does that to me. I need to stand upright more LOL.
|
|
Post Reply
|
Please note:
- Inappropriate messages or blatant advertising will be deleted. We cannot be held responsible for bad or inadequate advice.
- Plbg.com has no control over external content that may be linked to from messages posted here. Please follow external links with caution.
- Plbg.com is strictly for the exchange of plumbing related advice and NOT to ask about pricing/costs, nor where to find a product (try Google), nor how to operate or promote a business, nor for ethics (law) and the like questions.
- Plbg.com is also not a place to ask radiant heating (try HeatingHelp.com), electrical or even general construction type questions. We are exclusively for plumbing questions.
Search for plumbing parts on our sponsor's site:
Special thanks to our sponsor:

|


 Get rid of the hub and expose the spigot end of the elbow and use that.


