Over 698,000 strictly plumbing related posts
Plumbing education, information, advice, help and suggestions are provided by some of the most experienced plumbers who wish to "give back" to society. Since 1996 we have been the best online (strictly) PLUMBING advice site. If you have questions about plumbing, toilets, sinks, faucets, drains, sewers, water filters, venting, water heating, showers, pumps, and other strictly PLUMBING related issues then you've come to the right place. Please refrain from asking or discussing legal questions, or pricing, or where to purchase products, or any business issues, or for contractor referrals, or any other questions or issues not specifically related to plumbing. Keep all posts positive and absolutely no advertising. Our site is completely free, without ads or pop-ups and we don't tract you. We absolutely do not sell your personal information. We are made possible by: 
|
|
Author:
m & m (MD)
First, drill the holes on the same slant that you anticipate them coming up thru the slab. The holes thru the concrete need to be oversized. You're going to have to cut the tube to the approximate final length that you'll need. Then back the two lengths out the other floor opening ( this will take two people) and then gently sweep them thru the new holes.
|
|
Post Reply
|
|
|
Author:
stuckinlodi (MO)
Does copper pipe need protected with a sleeve or something when installed thru a hole in concrete?
|
|
Post Reply
|
|
|
Author:
sum (FL)
m&m if I back the pipes out from the other side where the slab cut opening is small, I will need to unbend the tubings as I feed into the hole again?
|
|
Post Reply
|
|
|
Author:
sum (FL)
yes a sleeve will be needed, I have that ready once the pipes are through I can drop them in.
|
|
Post Reply
|
|
|
Author:
stuckinlodi (MO)
I think you are going to have to run those 2 copper pipes up in the bay where the other pipes are. Unless you want to cut a 2 inch wide slot from the front edge of the concrete back to the bottom plate in that bay to the right, then push the 2 new copper pipes into place.
Edited 3 times.
|
|
Post Reply
|
|
|
Author:
packy (MA)
i would just bring them up inside the cabinet and make the tee connections there.
|
|
Post Reply
|
|
|
Author:
sum (FL)
Packy those lines are the supply lines going to the kitchen island in the apartment on the other side of the wall. The supply lines for the kitchen sink on this side is already piped and set, and the hot water going to tge other side is off a different manifold anyway. Plus if I bring them up on the floor these pipes will be kinked and dented while pouring concrete slab, setting tiles, install sheetrock, lighting, cabinet, appliances, cabinet, countertop etc...one of the installers will for sure step on or kick it.
Edited 1 times.
|
|
Post Reply
|
|
|
Author:
hj (AZ)
I would not even bother trying. There is more than enough room by the manifolds to fit those two tubes into the same space.
|
|
Post Reply
|
|
|
Author:
Don411 (IN)
I agree I would just bring them up where the other pipes are, why bust out even more concrete and notch the sole plate again?
|
|
Post Reply
|
|
|
Author:
sum (FL)
Wouldn't that be too crowded? I am trying to avoid having to solder next to the 2" PVC drain/vent pipe.
|
|
Post Reply
|
|
|
Author:
hj (AZ)
Just "protect" the drain lines and/or control the flame. We do it all the time.
|
|
Post Reply
|
|
|
Author:
bernabeu (SC)
ditto
wrap the pvc with a damp, not wet, towel/rag
==============================================
"Measure Twice & Cut Once" - Retired U.A. Local 1 & 638
|
|
Post Reply
|
|
|
Author:
Don411 (IN)
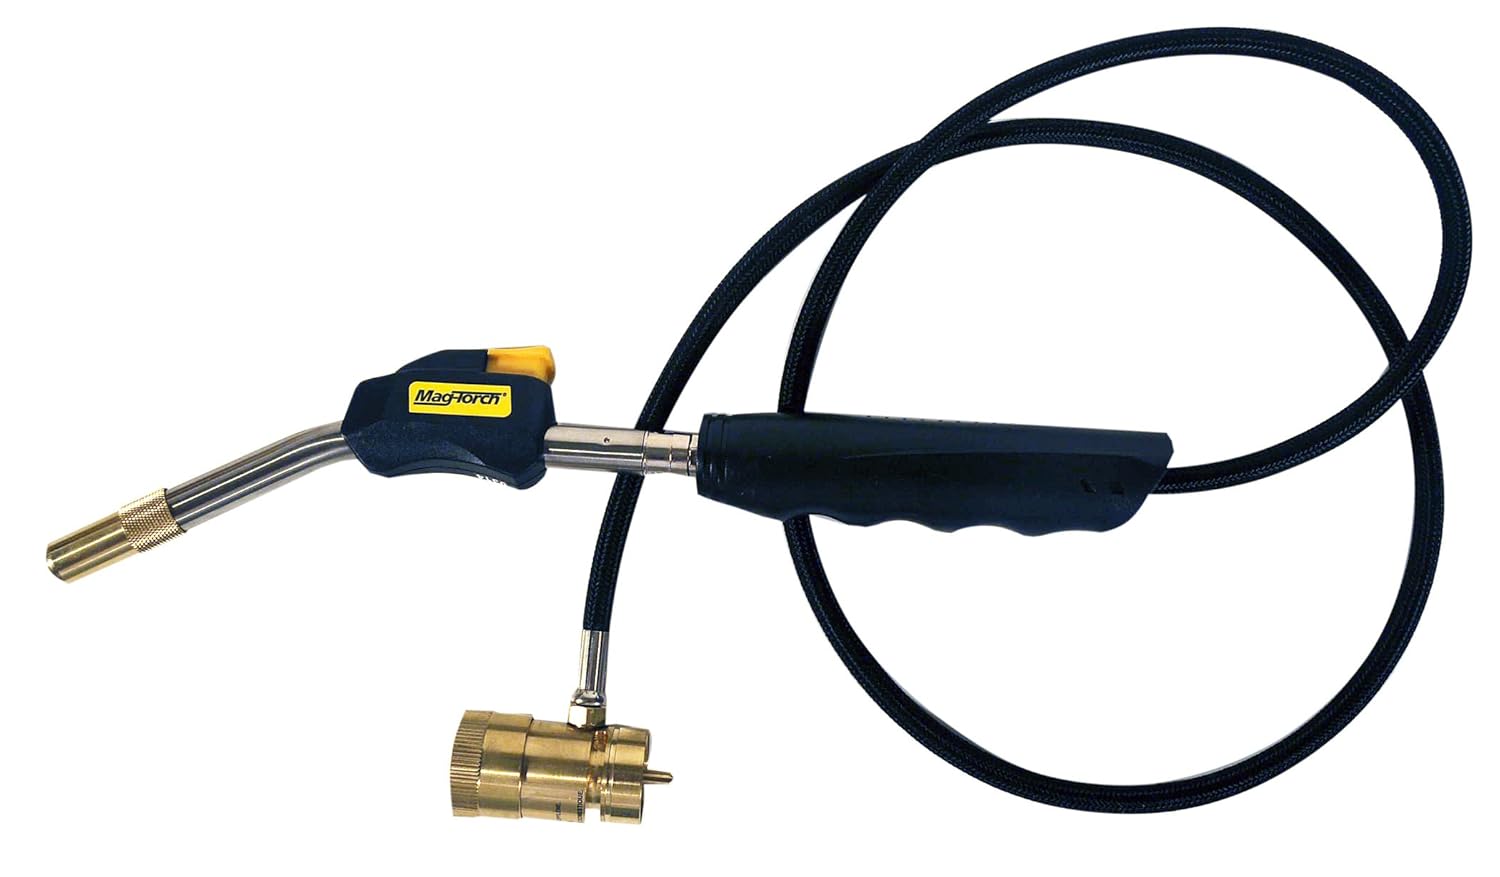
I have a piece of aluminum flashing that I keep in my plumbing tool bag that I use as a heat deflector when I have to solder right up next to framing, or if there are flammables nearby like insulation, NM wiring, PVC plumbing etc. As was said, control the flame so it's not pointing right at the spot you don't want hot.
I also use a hose torch like this (mine's older--no push button start) for better flame control.
Edited 1 times.
|
|
Post Reply
|
|
|
Author:
sum (FL)
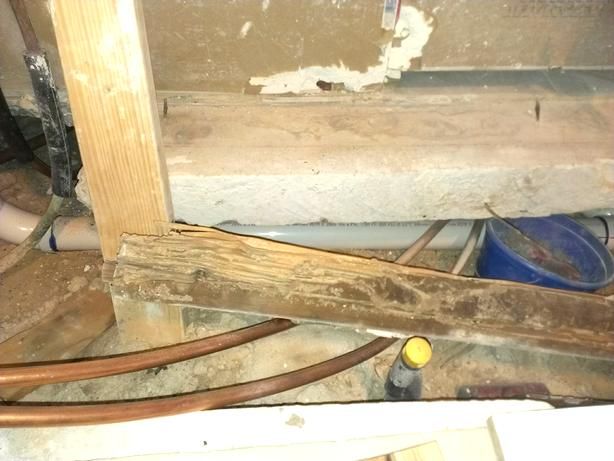
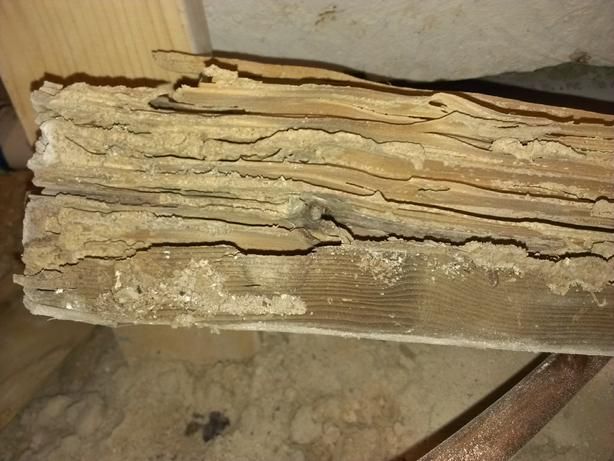
well guess what?
I pushed a finger through the bottom plate. In closer examination the wood was 80% destroyed by subterrainean termites. The destruction carries to the bottom 3-4" of the stud heels. Even though this is not a load bearing wall, it is taking the weight of the kitchen cabinets so I am going to redo some of the bottom framing now. Most likely the leaking old CI pipe was attracting sub termites and they traveled up the pipe sleeves and attacked the plates.
This project just won't end, every time I peel off one layer another rotten layer is underneath it. I can't believe the luck I am having...sigh...
Edited 1 times.
|
|
Post Reply
|
|
|
Author:
stuckinlodi (MO)
Good thing you aren't using that thinner copper, those Sunshine State critters might chew thru it.

Edited 1 times.
|
|
Post Reply
|
|
|
Author:
sum (FL)
I haven't seen any "super termites" yet. They are supposed to chew through asphalt sheetrock metal anything.
Most of what I have ran into are sub termites from below destroying wood very quickly, and drywood termites from up top eating through the roof framing. I have done four whole house tenting in the last ten years, and one complete perimeter sub term treatment. This house once I am done would need both. After I close up these slab holes and compacted the soil before I pour concrete I will soak them with termicide just to make sure.
I have heard of mice or other critters inside attic space chewing through PEX tubing and causing leaks though.
Yesterday was very frustrating once I found the bottom plate turned into swiss cheese. Now I have to do some carpentry before I get back into the plumbing end.
|
|
Post Reply
|
|
|
Author:
PlumberLoren (CA)
I would be concerned about the Cast Iron you did not replace. What makes you think that the rest of the CI pipe isn't also rusted out? Cast Iron pipe also can crack longitudinally. Much of the Mexican CI pipe has differing wall thicknesses from a flaw when they poured the cast Iron in the mold. I would seriously consider replacing all waste pipe under the slab with PVC or ABS. I like to sleep at night. I know, sounds like preaching, but I am just giving you my thoughts. Do you plan on willing the property to a loved one? Think about it. OK, I am done here!
|
|
Post Reply
|
|
|
Author:
sum (FL)
When I removed the rotted CI pipe I had the same concerns. At this point I am reasonably sure the rotted out section is localized for the following reasons.
(1) The sections that was rotted out, had an adversed slope. When they did the remodel in 2006-2008 and moved the kitchen drain to an island they messed with the drain line, they couldn't quite get the pipes aligned and instead used two rubber Ferncos and there is a "step" in the connection and part of the CI pipe was actually sloping backwards - this was the main reason for me to dig all this up to begin with. For this reason I believe the adversed sloped section had water permanently sitting there and accelerated the corrosion. This adversed slope section is now replaced.
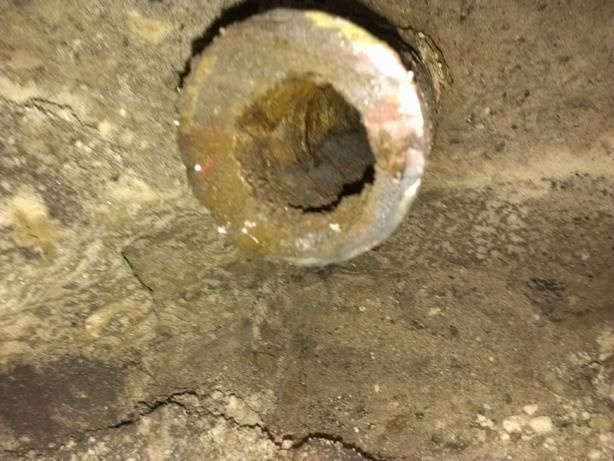
(2) The bottom was rotted out completely as shown in the picture below.
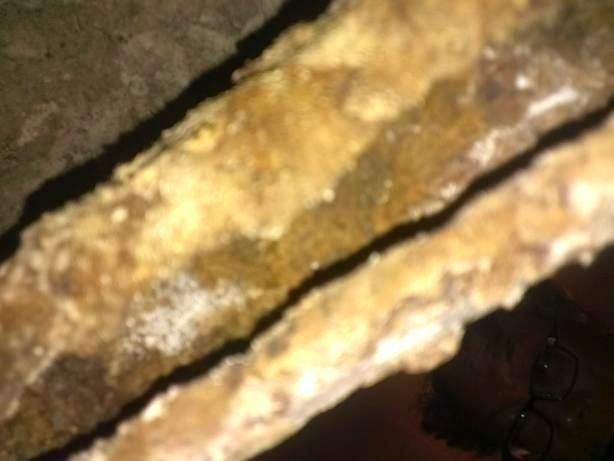
For this reason I had to cut the CI pipe further downstream. The point where I eventually made the cut and connection has at least 1/4" solid metal all the way around. See the cross section picture. Is it possible ten feet downstream there is another rusted out spot? Sure. But I do not see a reason to believe one way or another.
(3) Since 1955 the two kitchen sinks been dumping kitchen waste down there. I read somewhere that kitchen drains are most likely to be the most damaged pipes because of all the drain clearing chemicals people tend to pour down there in additional to typical kitchen waste. So that section being in the worse shape of all the pipes in that house make sense to me.
(4) Earlier this week while I was making supply line connections I found badly damaged bottom plate that is directly above the drain. As I poked the plate with a drill and a screwdriver to determine the extent of the damages I came to the same spot where I made the pipe connection from PVC to CI below. In other words, the bottom plate and lower heels of the studs were in bad shape where the leaky CI pipe I cut out, further downstream the plates are solid. This again seem to suggest the termites coming from below did not travel beyond the limits of the leaky CI pipe, if there are leaks downstream I would be seeing more termite damages above in other areas.
For these reasons I am not worrying about other leaks in the drains.
|
|
Post Reply
|
|
|
Author:
sum (FL)
OK I was able to remove the rotted bottom plate, as well as cut off the bottom 18" of the studs where the heels were termite damaged to varying degrees. Put in another plate across them at 18" and short studs across.
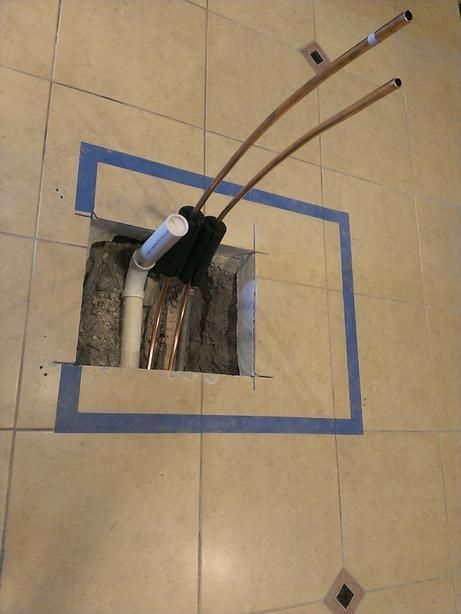
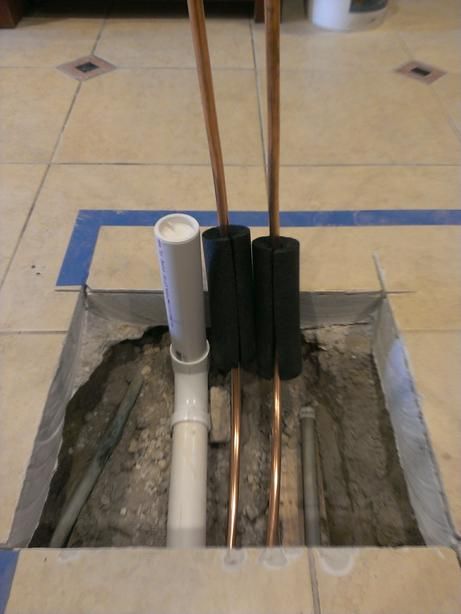
I then began to bend the soft copper into place. I was using a combination of hand bending, I also have a short piece of 1/2" spring bender, and a 1/2" bender that was meant for electrical EMT conduits which I probably shouldn't have used.
In any event, in the process of bending with the EMT bender, the copper pipe got "flattened" a bit. Here are some pictures. I hope this is still OK?
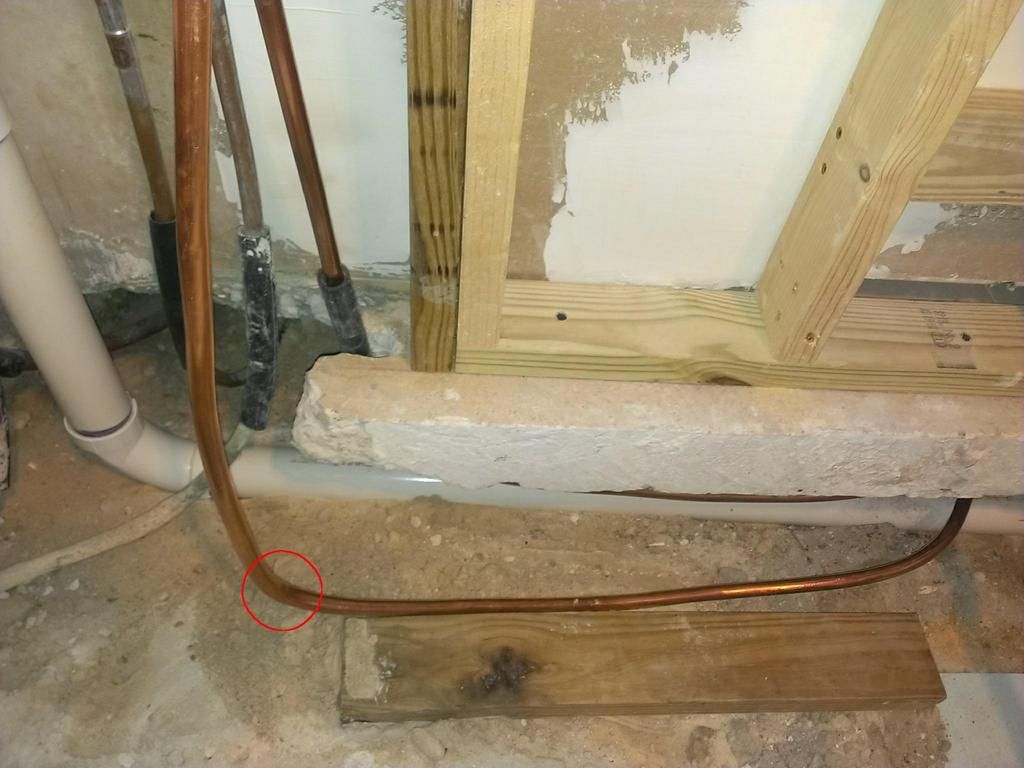
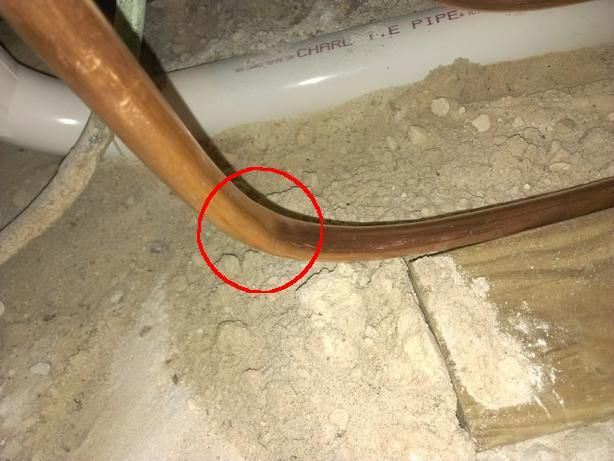
There is no kink. Just where it curved there is a spot that was slightly flattened. Did I mess up? I don't need to start over do I?
|
|
Post Reply
|
|
|
Author:
stuckinlodi (MO)
I'll bet that every guy here that has worked with copper has had that happen. I wouldn't worry about it if it passes the pressure leak test.
Edited 1 times.
|
|
Post Reply
|
|
|
Author:
sum (FL)
I was really careful but still this happened. The spring bender was easier to use then the EMT bender. I think I will keep the EMT bender away from copper.
|
|
Post Reply
|
|
|
Author:
sum (FL)
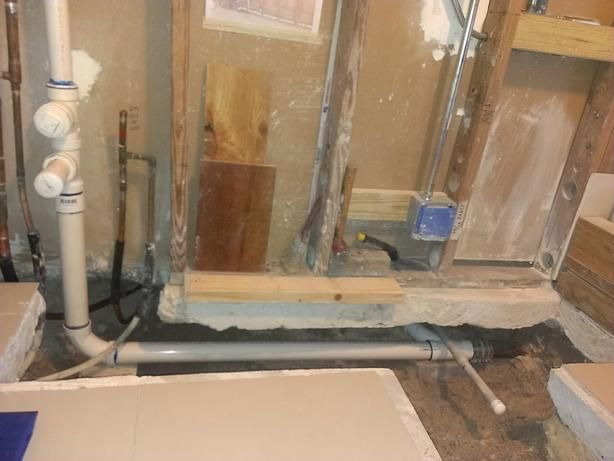
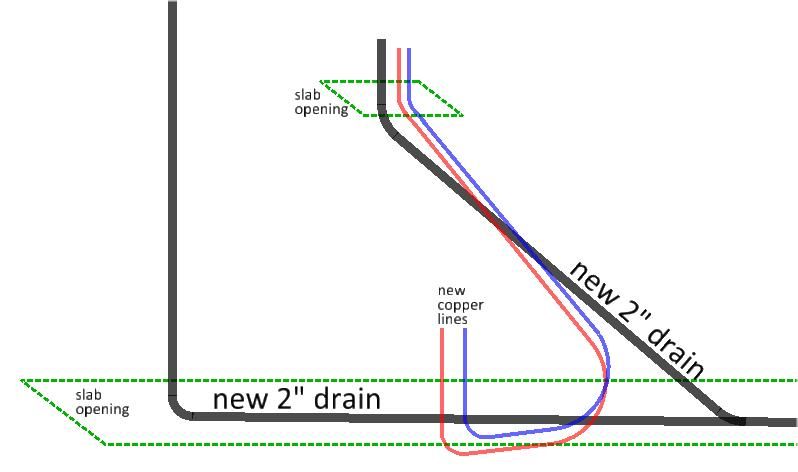
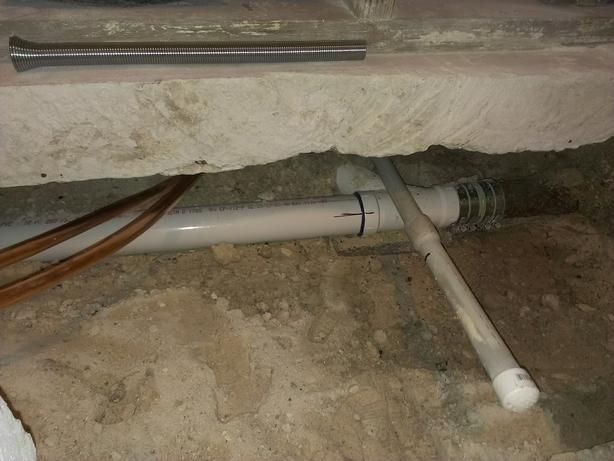
So here is what I have so far.
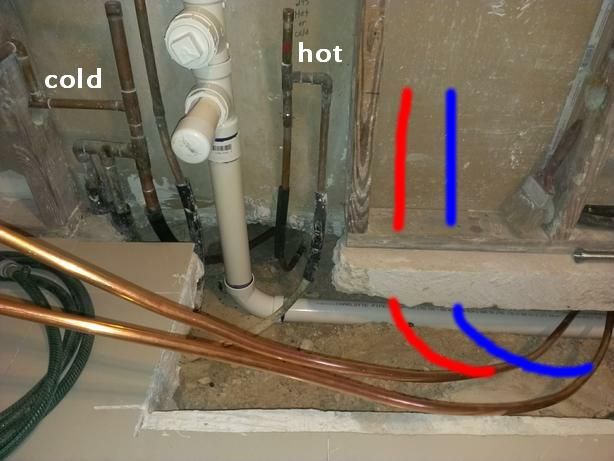
I drilled holes in the slab to get another 2" of space. Then I got both new 1/2" hot and cold copper into the spot I wanted them to go. In the following picture they are to the right. I put a red tape on the hot and blue on the cold.
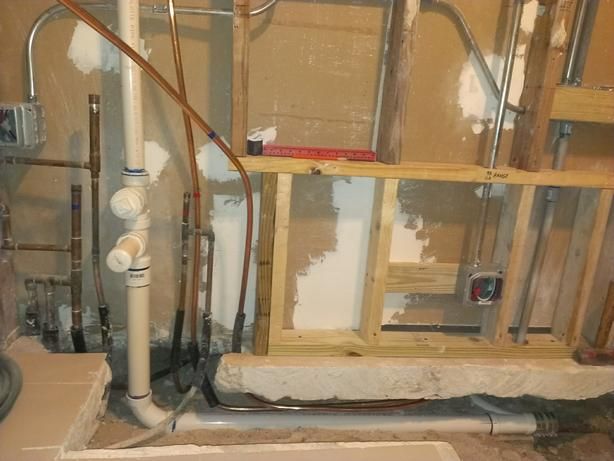
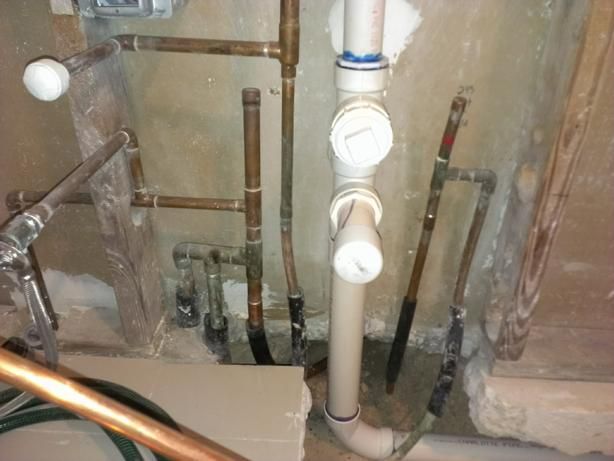
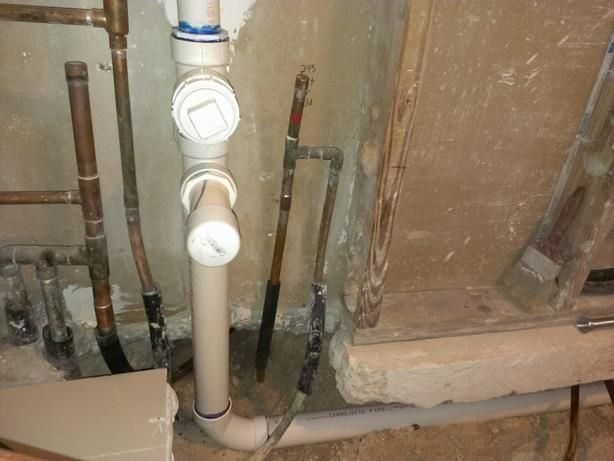
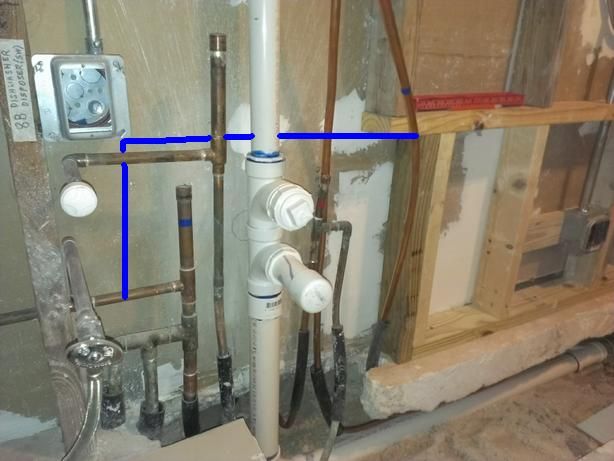
The hot is easier. I had it coming up in the middle of the existing manifold. So what I am planning to do is to just cut the short piece of horizontal pipe right down the middle, then insert a tee and the new pipe will go up in between. Like this.
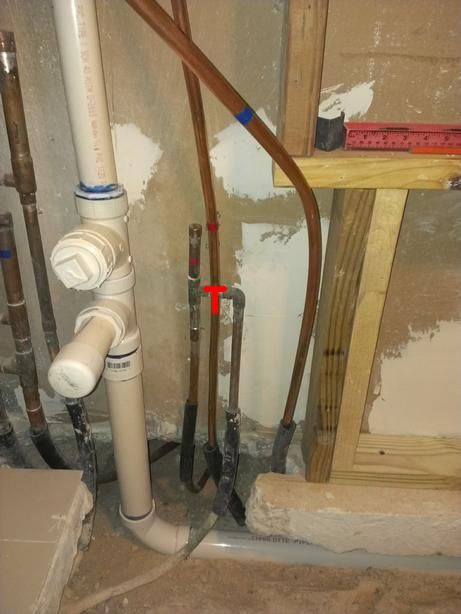
The cold is a bit tricky. I need to somehow tie the new pipe to the manifold to the left side manifold. I am trying to figure out how to get to that spot...and whether I bend the soft copper behind the PVC pipe or use hard copper to bridge over. Thoughts?
|
|
Post Reply
|
|
|
Author:
Don411 (IN)
Given your recent bending efforts, I would cut that soft copper and go to regular L pipe. Rather than tee into that 1/2" pipe where you indicate, I would cut that cap off on the top of that 3/4" cold pipe, add a 3/4-1/2 reducing street elbow combined with a 45* to get you behind the PVC and over to the new pipe. A short length of pipe, followed by another 45* and a 90* elbow should finish that connection.
Same on the hot water, I would tee into the 3/4 pipe, not the 1/2. You will get better performance out of the fixtures when they are connected to the 3/4" trunk because they are less affected by the pressure drop when other fixtures are in use.
I wouldn't worry about the flat spot on the pipe you bent....yes, technically the flow is reduced but you won't notice it. As long as it didn't kink hard it's not in danger of breaking. I would leave it be, and be thankful it will be buried so nobody will see it...
Edited 1 times.
|
|
Post Reply
|
|
|
Author:
sum (FL)
Don, thanks for the suggestions.
On the hot water pipes, I don't have a 3/4" connection. There are three manifolds here. The left side with the 3/4" is the cold water which I need to tie into. The middle one is the hot water for the apartment where the picture is taken from. The right manifold is the hot water for the kitchen island on the apartment on the other side of the wall which I need to tie into.
There is no 3/4" hot water line. 3/4" cold goes to the hot water heater for each apartment and 1/2" hot water pipe comes off them.
The two apartments have their own individual shutoff valves and all the supply lines are delineated properly except at the kitchen wall where the cold water is being fed by the line from apartment A to the cold side of A and B. I don't know if that's originally that way, or someone along the way eliminated or combined something.
On the cold side I think using hard pipes might be my best bet, I don't think I can bend a U shape behind that PVC pipe without kinking it and having to do it in place. With the hard pipes I can solder the piece ahead of time and only having to solder two fittings near that crowded spot.
|
|
Post Reply
|
|
|
Author:
Don411 (IN)
Gotcha, I see it now. You're almost at the end of this project!
|
|
Post Reply
|
|
|
Author:
sum (FL)
I hope I am at the end of "THIS" project. But my projects tend to weave into each other. I never get a break. 
|
|
Post Reply
|
Please note:
- Inappropriate messages or blatant advertising will be deleted. We cannot be held responsible for bad or inadequate advice.
- Plbg.com has no control over external content that may be linked to from messages posted here. Please follow external links with caution.
- Plbg.com is strictly for the exchange of plumbing related advice and NOT to ask about pricing/costs, nor where to find a product (try Google), nor how to operate or promote a business, nor for ethics (law) and the like questions.
- Plbg.com is also not a place to ask radiant heating (try HeatingHelp.com), electrical or even general construction type questions. We are exclusively for plumbing questions.
Search for plumbing parts on our sponsor's site:
Special thanks to our sponsor:

|