 
Over 698,000 strictly plumbing related posts
Plumbing education, information, advice, help and suggestions are provided by some of the most experienced plumbers who wish to "give back" to society. Since 1996 we have been the best online (strictly) PLUMBING advice site. If you have questions about plumbing, toilets, sinks, faucets, drains, sewers, water filters, venting, water heating, showers, pumps, and other strictly PLUMBING related issues then you've come to the right place. Please refrain from asking or discussing legal questions, or pricing, or where to purchase products, or any business issues, or for contractor referrals, or any other questions or issues not specifically related to plumbing. Keep all posts positive and absolutely no advertising. Our site is completely free, without ads or pop-ups and we don't tract you. We absolutely do not sell your personal information. We are made possible by: 
|
|
Author:
sbmmm (FL)
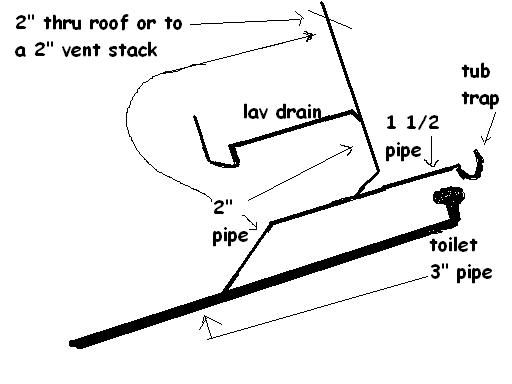
I have been working on my DWV project under an existing roof. There used to be an outside laundry room and toilet. I am expanding this into a complete addition as finished livable space. The link below shows a photo album with the floor plan, the venting drawing and a dry fit mock-up of the pipes and fittings. I am required to use 2012 UPC or 2012 IPC code in my city.
I have intentionally cut the ABS long for the purposes of the mock-up. As a result, some pipe pitch may look off or pieces may be listing. I will cut and glue to 1/4" per foot for all pipe including the vent pipes.
Notes:
1. One dry vent is identified as 1 1/2" at the roof, but I am using 2" pipe up to the underside of the roof. I have a Fernco reducing clamp to attach the ABS to the galvanized pipe going outside. If required, I can make this penetration 2" to accommodate a full 2" need.
2.Pipes and fittings:
- 3" pipe and fittings are used for the WC and main drain line.
- 2" pipe and fittings are used for the shower, the clothes washer and LT.
- 1 1/2" pipe and fittings for the lav.
- A 3"->2" reducer is used above the upstream bend that leads to a 2" cleanout.
- The 3" wyes that lead to shower and lav have 2" and 1 1/2" joints, respectively.
QUESTIONS:
1. Is the venting, as illustrated sufficient and in the correct positions?
2. Does the 1 1/2" vent penetration in the roof need to be enlarged? (hopefully not, but doable)
3. I could combine both vent pipes above the ceiling, thereby having a 2" penetration and a 1 1/2" penetration on the same vent circuit. Would that be beneficial and to code?
4. Could I enlarge the branch drain line from the Lav from 1 1/2" to 2" and turn that into a wet vent and thereby, eliminate the need for a dedicated dry vent above the Lav line?
5. In order to pass inspection, I purchased a threaded rubber balloon to use in the cleanout tee at the old and new junction and plugs to use in every other opening except where I'll add the water. Does there usually need to be a vertical column of pipe of a certain height when adding the water for inspectors? (I know municipalities have different code books, etc., but generally?)
Thanks for reading. Long, I know, but I'm putting what I can in one post to help those who can answer my questions. At this point, I am ready to make final cuts, glue, test and call for an inspection, but I want to know from the qualified pros if this design passes 2012 code in all regards. I'm sure there are some mistakes...
Photo album can be seen here - [imgur.com]
Edited 2 times.
|
|
Post Reply
|
|
|
Author:
Howman69 (CA)
Your plumbing is incorrect in a lot of ways I will do my best to tell you everything I see right off and go from there. First of all your vent through the roof will have to be a 2" because it serves a toilet, toilets require a min. of a 2" but you can tie all the vents to one going through the roof to the 2" . Some county's in Ca. make you grade the vent the same as a drain even above the flood rim of the fixtures but most do not and can run it flat with no sag's as long as you are at least 6" above the flood rim of the fixtures. another item I see is the way you are venting, the toilet after it branches off the main trunk line needs to have a vent added to it, the vent will need to be added with a wye fitting and don't roll the vent coming off the side flat, will need to roll the 2" side of the wye up in a angle leaving the 3" off the front draining 1/4" per foot (almost as it is now on that part) then the 2" vent can turn to a 1/4"per foot. it is called a flat vent. a flat vent will need to turn up in the wall and tie in with the others with no other drain tied in so the vent is undisturbed the shower shows to have no vent at all the way you have it so you will need to add that in also alot like the toilet can be done but only needs to be a 1 1/2" vent and if it turns to a flat vent the same rule will apply and if it is not a flat vent and wish to be a wet vent you will have to increase the size in between the fixtures 1 pipe size. The drain line catching the lavatory that shoots way over with a 1 1//2" drain will need a clean out added and can be above the floor with a tee fitting stubbing out side is best or pointing inside under the sink in the cabinet. If you agree with what all I have told you and need any other questions answered just ask me. hope this helps you I know it is long but a lot of info for you and it is all correctly answered from a 30 year plumber
|
|
Post Reply
|
|
|
Author:
sbmmm (FL)
Great! Thanks for starting me off, I've been stalled without the definitive help I needed.
Ok, so I can understand, you are saying,
1. All venting can use a single 2" roof penetration if tied together above the FLR, or in my case, above the ceiling Joists. I was thinking that if the 1 1/2" penetration AND the 2" penetration were all tied together with 2" pipe (not just the 2" penetration by itself) that the sum total of available air access might be considered 3 1/2". Would that be true? Would that be beneficial and alter the venting design in any way?
2. Proper Toilet venting. I need to add a flat vent to the WC branch using a 3" Wye with a 2" branch arm + 45* and vent without sharing until it connects above the ceiling (in my design). Here is a mock-up for this concept. Is this what you mean? - [imgur.com]
3. The shower is not vented. (?) Did you see the 3" 90*, upstream of the shower wye? As that extends vertically upstream, it reduces to 2" and provides an end-of-the-line cleanout before it continues on as a vent (where the red tape is). Everything upstream from the shower wye on the main trunk is a dry vent that continues up to the 1 1/2" roof penetration. It's designed with 2" pipe from the reducer to the underside of the roof where a fernco reducing clamp attaches to the 1 1/2" opening. If combining this vent penetration and pipe with the other vent penetration and pipe, thereby making one circuit with two roof penetrations isn't suffcient, then I could change the roof pipe flashing on the 1 1/2" and make that 2". Then there would be two 2" roof penetrations, both being fed with 2" pipe. Does this still require a flat vent for the shower fixture? Am I missing something here?
Follow-up question, does this venting clarification alter the need for flat venting the toilet?
4. A cleanout is needed on the Lav line. I prefer it to be inside the cabinet, so I made possible mock-up. I will tighten up the CO stub out and put it closer to the trap arm of the sink with final measurements/cuts. See mock-up here - [imgur.com]
Another follow-up, if I upsize the pipe size for the Lav branch drain from 1 1/2" to 2", will this create a wet vent and eliminate the need for a dedicated dry vent?
Thanks for the help.
Edited 2 times.
|
|
Post Reply
|
|
|
Author:
packy (MA)
you going to get as many opinions as plumbers responding.
i would put a 3 x 2 'y' into the toilet pipe. use that 2 inch to pick up the shower and to pick up the lav. classic wet vent.
move the 'y' for the toilet further downstream and do something like this. make the shower drain 2 inch rather than the 1 1/2 as shown. also, roll up all 'y's.
|
|
Post Reply
|
|
|
Author:
Howman69 (CA)
1- To equal the drain through the roof with venting you have to figure the total square inches in the diameter of the drain and vents. If your house has a 3" sewer coming out of the house then that is what you figure for and even if it is a 4" and you only require a 3" then you figure only for the drain that you are required to have so a 3" sewer would have 7.07 square inches and 2-2" vents at 3.14 square inches inside and one 11/2" vent at 1.77 inches your total you would have is 8.06 inches so slightly over and good.
2- any and every trap must have a vent, each vent is only allowed to serve one trap, one trap can serve up to 3 sinks or compartments like a kitchen has up to 3 compartments so you tie all three together and tie to the one trap also you can have one vent with more than one trap arms as long as they come off the line separate off the vent like with a double fixture fitting.
3- the shower vent like you are showing is not vented correct and is why I said not vented sorry I wasn't clear on that one, the vent you have shown has the vent taking off at the same height as the drain line and must come off the upper half of the drain. like you have the W.C. vent you are adding in the line and rolling the 2" on the side of the wye slightly up so the lower edge of the vent inside the wye is just above the half way mark on the wye so the vent is higher than the vent.
4- C.O. rules - a drain coming off a main line that has a clean out can run horizontal up to 5' then will need a clean out added if its over this rule will apply to all except that sinks and urinals require a clean out unless coming off a main line vertical or within a 72 degree angle of a line served by a clean out
Plumbing definition of vertical is 45 degrees so above is vertical and below is horizontal
I hope I got this in clear language but if not I would be not be shocked if you under stood it anyways. your understanding of all so far is really good if you are not a plumber. you are very understanding or are catching on very quickly if you are not a plumber. complement to you (to)
|
|
Post Reply
|
|
|
Author:
Howman69 (CA)
that looks good except your vent for the toilet looks like a flat vent and if so you can not wet vent using a flat vent, correct?
|
|
Post Reply
|
|
|
Author:
steve (CA)
Don't reduce the cleanout size. Keep it 3".
|
|
Post Reply
|
|
|
Author:
packy (MA)
the good thing about a wet vent is that even though the pipe off the toilet is flat (1/4 inch pitch actually) it is being washed by the fixtures above it. if it does block up, you will know as the fixtures on it will not drain..
|
|
Post Reply
|
|
|
Author:
sbmmm (FL)
Thanks for the responses.
Howman, thanks for the compliment, but I am not a plumber, definitely picking up code and DWV venting concepts. However, when I am interested, my mistress is Gisele Bundchen and Tom Brady is totally cool with it because...I am the most interesting man in the world.
All kidding aside, I appreciate the insight from you plumbing pros. I also think there are almost always multiple ways to do the same job while still meeting code. And it that light, I have combined some of the concepts each of you have presented in this thread. I also created a new mock-up and labeled two pictures below to illustrate my thought processes. Definitely, make corrections as you see them.
I understand the need pointed out to better vent the WC and shower. The flat vent on the toilet makes sense, but I feel apprehensive about the horizontal piece of that flat section if there is a back-up of WC waste. It could sit and fester without a special effort to clean it out. The concept of a wet vent with an upstream fixture made sense, thereby washing out any backed up waste in that horizontal pipe section when that fixture drains. However, based on the existing slab cuts, trenching and walls for piping, it seems too complex to tie the Lav AND the Shower upstream of the WC on the same wet vent. How about treating the Lav and Shower vent connections separately and use either fixture for the wet vent to service the toilet venting?
I try to offer two possible options to solve this. In the first picture, I would roll up the wye on the WC line as Howman suggests, but route it back as a wet vent (as packy alludes). It would vent vertically off of the shower line using a 2" wye and 45*s up the back 2" dry vent using another wye at its connection (the green wye graphic). The 3" wye on the main trunk for the shower would be eliminated, identified as "E."
Specifically, "A" would replace the 3" pipe section on the WC line and "C" would connect with the vertical dry vent (and cleanout).

-
Follow-up question here -
1. Can "A" roll up and connect to "B" thereby using the Clothes Washer and LT drain as the wet vent? If so, the shower could still use the upward wye to dry vent while not eliminating the wye at "E" for the shower drain?
2. I don't have to reduce the 3" point at "D" and could continue up to the cleanout with 3" pipe/fittings, if necessary (with 2" vent pipe above the CO). Would that be better, as Steve suggested?
In the second picture (I think I like this direction more), the WC drain would go downstream of the Lav and use the Lav's drain (Upgraded to 2" pipe) as a wet vent (with 2" dry venting above the Lav, as well).
IOW, "C" would move down to "A" and "B" would connect at "k" with 2" Lav branch line using a 3"-2"-3" wye and 45*. Also, since "E" is bad as a horizontal dry vent below the FLR and would choke off the vent to the shower, I would use the same shower vent design as presented in the first picture (unless there are corrections to come).
[imgur.com]

-
Thoughts and corrections now?
Edited 4 times.
|
|
Post Reply
|
|
|
Author:
packy (MA)
i hope you understand this...
move c to position a...
run that directly to the toilet location.
cut in a 3 x 2 y down close to a
in that 2 inch line put a 2 inch y rolled up so it goes over the toilet pipe. out of the side of the y pick up the sink. come out the back of the y and pick up the shower,this will vent the toilet the shower and the sink.
cabeesh?
|
|
Post Reply
|
|
|
Author:
sbmmm (FL)
Quote
To equal the drain through the roof with venting you have to figure the total square inches in the diameter of the drain and vents. If your house has a 3" sewer coming out of the house then that is what you figure for and even if it is a 4" and you only require a 3" then you figure only for the drain that you are required to have so a 3" sewer would have 7.07 square inches and 2-2" vents at 3.14 square inches inside and one 11/2" vent at 1.77 inches your total you would have is 8.06 inches so slightly over and good.
Actually, I only have one 2" penetration and one 1 1/2" penetration (that can be enlarged). So, what you're saying is, even if I enlarged the second vent to 2", creating two 2" penetrations, they aren't equal to the 3" drain line. Technically, it would be 7.07" vs 6.28" which means the two 2" wouldn't be enough, correct?
If that's isn't enough, then I would probably enlarge the 1 1/2" penetration (because of its more accessible location) to 3" and route all vents to there. Are there any code rules how to tie multiple branches into single exit pipe of a larger size? Or is a reduction allowed before they were to meet the larger exit pipe? IOW, could two of the 2" lines converge (like on the same circuit) and enter the 3" fitting? That would seem to defeat the logic as I now understand it, but I'm not sure. As of now, I would have three 2" pipes looking to vent through the 3" opening. What is acceptable by 2012 code? How would you guys handle through the roof venting in this case?
I appreciate the help.
|
|
Post Reply
|
|
|
Author:
sbmmm (FL)
packy, I used to live in Boston and New York. I know capeesh very well.
As far as your description goes now, I capeesh the design. That would eliminate the need for the rolled over wye at the shower since all three fixtures are using the wet vent of the Lav and the dry vent extension above it.
That helps, thanks.
As of now,
1. Your suggested design also means that I wouldn't have to run a dry vent up beyond the cleanout at the upstream end-of-the-line pipe, since all fixtures are vented from two other vertical pipes (above the Lav and above the CW/LT), correct? That would just turn into a cleanout access.
2. What do you think of the cleanout access? Would you reduce it down to a 2" CO plug? Or keep it at 3" as Steve suggested in another post?
3. Currently, with only two, 2" roof penetrations, would you upsize one to 3" and just use that opening for all venting and disregard the other?
Edited 1 times.
|
|
Post Reply
|
|
|
Author:
Howman69 (CA)
I just want to get one more in to you, First of all the wet vent can not be on a flat vent, wet venting must maintain vertical through out if you flat vent then you will need to stub another drain up. look wet venting rules up, it must be on the same floor level, can not be horizontal so no flat vent with wet vent, and the vent through the roof you will be considering the whole house already existing even if it exits the foundation separate. If your house has at least one other 2" vent and one other 1-1/2" vent then you will be able to use one 2" in your addition. and any vent by code can not run horizontal below the flood rim of the fixture it serves unless it is absolutely impossible to do another way. a lot of places let you do this for like a kitchen vent that is under a window but if it had been planned right from the beginning the vent would go straight up and the dirty arm or trap arm will go under the window from the vent towards the sink. the other drawings have flaws in them as in not legal, it does not mean it wont work or may pass inspection but still is not code. If you trust all I have told you it is all correct if not you may not pass inspection. I am not trying to insult anyone who has made comments on here so please don't think that, I just am positive in my answers and if you disagree then look it up and if your opinion is that I have noted something wrong then feel free to reply to me and I will be glad to converse on what ever it may be . I am open minded and always ready to learn something new thanks to all of you for trying to help out on these plumbing issues, you must be a lot like my self and enjoy helping others.
|
|
Post Reply
|
|
|
Author:
Howman69 (CA)
He should not need a clean out there at all as he has a two way clean out at the beginning, did you see it on the pictur, it is by the test tee
|
|
Post Reply
|
|
|
Author:
Howman69 (CA)
here are some helpful codes for you and this set up. first
#1- the main drain requires a two way clean out at the start of the main line going into the foundation (just like you have)
#2-a 3" drain is allowed 135 degrees in direction change after that you would need another C.O. 2" and under are allowed only 90 degrees then another C.O. would need.
#3-3" trap arm can go a max. of 6' or 72" after the trap total developed length. 2" trap arm is allowed to run a distance of 5' or 60" then 1-1/2" trap arm can run 3'6" or 42"
#4-a drain can run for 5' before it needs a clean out so keep the last drain within 5' of the toilet vent you will not need the end of line clean out. except that if the drain is serving sink or urinal (lav is not considered a sink) so sink or urinal will need a clean out unless it is directly above a drain being served with a clean out or within a 72 degree angle.
#5 a wet vent can not have a horizontal run within the wet vent(no flat vent)
#6 all traps must have a vent to protect its seal, only one trap is allowed to be on each trap arm but you can have two trap arm coming off at the same level using a double fixture fitting.
#7 wet vent is also limited to one and two fixture unit fixtures so can not drain a shower into a toilet vent look up fixture unit values on DWV (fixture unit values are different between water and DWV
#8- AW drain rules/ AW trap must be roughed in above the floor level/ and must be roughed in with the trap being 12" min and 18" max height above the floor/ the distance between the vent edge and the weir of the trap must be double the distance as the drain diameter so 4" / the stand pipe must be a min of 18" and 30" max
That is pretty much all I can think of right now and please touch base again and share your inspection results when it happens. Howman69. and 69 represents my birth year not the other lol
|
|
Post Reply
|
|
|
Author:
packy (MA)
your code must be different than my code. the confusion is whether a wet vent can be flat. mine says it can.
|
|
Post Reply
|
|
|
Author:
steve (CA)
Allows horizontal wet venting for a bathroom group. The amendment of the UPC, prohibiting it was removed a couple code cycles ago.
|
|
Post Reply
|
|
|
Author:
Howman69 (CA)
Really it has huh, I did not know that so thanks for sharing the information and giving me the reference to look it up. Like I said I am always ready to learn and if a person thinks he has learned all you need to know then he is done period. Thanks guys
|
|
Post Reply
|
|
|
Author:
Howman69 (CA)
I did look this up and I have never seen this change so thanks again as it will save me from looking like an @#$%& to anyone else. so as I understand it how its written you can break off the horizontal vent to add in fixtures and you have to then add into that drain another dry vent so it will actually have its own vent. I believe this is what it is describing or am I wrong on this . please confirm if its right. Also I have a question for you. I am dealing with a lot of clients lately that do not like or want an air gap on the kitchen sink for the dishwasher. I have been looking into the Johnson's Tee air gap. this is a great product and with the right circumstances it would work correctly by all the code issues except one I am not sure of. Code says for a dishwasher it must drain through a approved and listed air gap fitting so I have not gotten any details on weather this is a listed a[proved air gap or not. Do you know anything on this. Thanks for all your time and effort for updating me on code.
|
|
Post Reply
|
|
|
Author:
sbmmm (FL)
[EDIT]: I often start a post reply, but need to finish a task somewhere else or need to do a little research before hitting send. In the meantime, there are often one or more replies by others that address one issue or another in my reply. Sometimes my responses seem redundant. Nevertheless, this post reply was one of those, but I decided to leave it as I originally wrote it. [End of EDIT]
Ok, I'm a bit confused, but let me try to sum up what I'm reading. BTW, I really appreciate hashing this out in good spirits.
Note: If I didn't mention it before, the main house has its own DWV. This design is for a separate addition that uses 3" drain line tying into 4" line outside the house.
1. With packy's design, I would use the 2" branch line to the (single) Lav as a wet vent for the WC and shower, but it would be a flat wet vent. As a result, in the current mock-up, I could eliminate the main trunk upstream of the CW/LT connection, especially since Howman spotted that there is a 3" double cleanout outside the foundation in the back yard. Is this correct so far?
2. With Howman's cited code the flat wet vent is a problem. So, in order to properly vent the toilet and shower, the design would require rolling up wyes at the each fixture branch creating a flat vent for at least the toilet. In this case, I would use my toilet flat vent mock-up and the shower vent portion mock-up (identified with a green wye graphic) in the second to last picture above.
This all seems to come down to code year/timing. Here is what I found. BTW, Phoenix, AZ uses 2012 UPC code.
[archive.org]
Assuming I use the flat wet vent design, the questions that remain are:
1. In language contained in 908.2.1, it states for a flat wet vent situation, "only one vented fixture drain or trap arm shall discharge upstream of the dry vented fixture drain connection." Is this a problem?
2. I'm still unclear what's required when tying in the vent opening/s at the roof. What should I design?
Thanks.
Edited 2 times.
|
|
Post Reply
|
|
|
Author:
packy (MA)
the drain for a wet vent must be increase one pipe size. so the drain for a sink would ordinarily be 1 1/2 must now be 2 inch all the way to either thru the roof or until it joins a vent stack.
and don't worry about looking like an @#$#@$#.. codes differ around the country and they are constantly changing. the person who claims to know everything about every code is the @#$#$#$...
|
|
Post Reply
|
|
|
Author:
sbmmm (FL)
Ok, good. The 2" upsize in the flat wet vent size works. Yes, I can see how code changes all the time.
A remaining question is about through-the-roof access. With two 2" vertical dry vents rising above the ceiling joists (one above the Lav and one above the CW/LT), what do I need to do to vent outside properly?
Also, if setting up a water test for inspection of below slab DWV work, do I need to add a (2" 10' column? 10' column?
Edited 2 times.
|
|
Post Reply
|
|
|
Author:
sbmmm (FL)
Here is a condensed version of the wet vent design. How does it look? Does the degree of the 2" rolled up wye matter other than to make it over the WC line? Or should I have rolled up the 3-2 wye on the WC line in order to put the Lav and Shower on the same elevation (above the WC line)? I think I put this together as packy suggested, but would appreciate confirmation. I am ready to build, glue and test this tomorrow. Thanks for the help!
BTW, a technique, best practice question - my intended assembly method will be to go joint by joint starting at the furthest downstream fitting and build up from there. I will first dry fit each fitting connection finding the correct 1/4"-ft pitch and, with a silver sharpie, mark two parallel lines across the joint onto both connecting pieces. Then, I will disconnect the dry fit joint, add glue to both pieces and fully seat the pieces together, but off by about 90* from the marks and twist to align the marks exactly. Kind of like one complete insert-and-twist motion, but with a plan. This may sound elementary, but I would like to know if this technique makes sense to the pros. When putting together a "system" like this, what is your preferred assembly technique/s?

Edited 2 times.
|
|
Post Reply
|
|
|
Author:
exapprentice30 (MA)
You can t offset below the shower trap until after its vented.
|
|
Post Reply
|
|
|
Author:
sbmmm (FL)
Ok, the extra jog came from the condensed version of the mock-up. The rolled up 2" wye was too close the WC connection in the mock-up. In the two pictures below, I increased the distance from the 2" wye to the WC line, eliminating the extra jog. Good now?
However, if you're saying it's still a code violation, then the 2" wye can't be rolled up in this context (unless I misinterpreted packy's instruction). Correct?

-

|
|
Post Reply
|
|
|
Author:
exapprentice30 (MA)
The sink connection can be rolled up but the shower drain must not exceed 1/4 inch per foot pitch or drop below the water level of the trap before the vent connection.
|
|
Post Reply
|
|
|
Author:
sbmmm (FL)
Thanks exapprentice. My problem is I don't need the sink connection rolled up, I need the shower connection rolled up to get over the WC line.
One way to solve this (and keep packy's efficient design) is to position the 2" wye closer to the Lav (and not roll it up) so the shower line travels behind the WC, parallel to the main trunk line, thereby keeping the horizontal drains of the Lav, shower and toilet on the same level. But that will not happen because it requires me to either remove more concrete slab and dirt or make a horizontal bore through the dirt Under the slab (possible, but hard to match correct pitch and it hides from inspector).
I thought I matched packy's design, but I may not have done 100% as he intended. Maybe he has a correction coming?Nevertheless, rather than hammer up more concrete, I would rather solve with a modified ABS design. Below is another mock-up where to consider. I still use the Lav as a wet vent for the WC, but provide a dedicated vent for the shower. This creates and additional vertical pipe to tie in above the ceiling, but that's OK.
Any thoughts/corrections/suggestions? Thanks.

-

Edited 1 times.
|
|
Post Reply
|
|
|
Author:
packy (MA)
all you have to do is roll up the 3 x 2 y...use a 45 instead of a street 45 coming out of the 3 x 2 y..
|
|
Post Reply
|
|
|
Author:
sbmmm (FL)
So, the wet vent can change grades, but the branch lines that are being vented cannot? I tried rolling up the 3-2 wye last night after I read exapprentice's post, but there was obviously still a dip happening and I wasn't sure about that either. Anyway, here is my quick mock-up change. I am ready to glue and test. Tell me what you think. Also, please let me know about my assembly procedure noted above and if I need a 10' water column for the inspector?
Thanks the help.

-

|
|
Post Reply
|
|
|
Author:
exapprentice30 (MA)
You may need a long sweep on the toilet drain and on the end run and I don t know the AZ plumbing code too.
|
|
Post Reply
|
|
|
Author:
sbmmm (FL)
I just wanted to say thanks to everyone who responded to this thread. A while back I passed my below slab DWV inspection on the first attempt after hashing it out with you guys. I very much appreciated it! Great forum.
Edited 1 times.
|
|
Post Reply
|
Please note:
- Inappropriate messages or blatant advertising will be deleted. We cannot be held responsible for bad or inadequate advice.
- Plbg.com has no control over external content that may be linked to from messages posted here. Please follow external links with caution.
- Plbg.com is strictly for the exchange of plumbing related advice and NOT to ask about pricing/costs, nor where to find a product (try Google), nor how to operate or promote a business, nor for ethics (law) and the like questions.
- Plbg.com is also not a place to ask radiant heating (try HeatingHelp.com), electrical or even general construction type questions. We are exclusively for plumbing questions.
Search for plumbing parts on our sponsor's site:
Special thanks to our sponsor:

|
