 
Over 698,000 strictly plumbing related posts
Plumbing education, information, advice, help and suggestions are provided by some of the most experienced plumbers who wish to "give back" to society. Since 1996 we have been the best online (strictly) PLUMBING advice site. If you have questions about plumbing, toilets, sinks, faucets, drains, sewers, water filters, venting, water heating, showers, pumps, and other strictly PLUMBING related issues then you've come to the right place. Please refrain from asking or discussing legal questions, or pricing, or where to purchase products, or any business issues, or for contractor referrals, or any other questions or issues not specifically related to plumbing. Keep all posts positive and absolutely no advertising. Our site is completely free, without ads or pop-ups and we don't tract you. We absolutely do not sell your personal information. We are made possible by: 
|
|
Author:
Turbo98 (MO)
Hello,
I have two outdoor frost proof silcocks. They are about 40 years old. I'm not sure of the brand though.
A few years ago, I replaced the washer on the end to stop them from dripping out of the spout and that fixed it. Now they are both leaking out of the stem pretty bad when they are turned on. I took them apart and the large o-ring that surrounds the plastic packing nut is brittle and needs replacing. The packing washers have seen better days also. So I went to a local plumbing supply place with the parts and they sold me a couple Prier Hyndrant Repair Kits. The kits have washers for both a left hand and right hand design. From what I can tell, I have a RH design as the packing nut unscrews from the faucet counter-clockwise. I have a couple questions.
What is the correct packing waster set-up for this faucet? There is a large packing washer and a small packing washer. There is also possibly a large brass washer involved that is the diameter of the larger packing washer. If I use the larger packing washer, it seems that I would need that large brass washer behind it to support it. Then the plastic packing nut would seat flat against it. That doesn't seem exactly right but it could be. If I use just the small packing washer by itself, it is fully supported by (and the same diameter as) the built-in washer. Is small enough that it will fit inside the tapered hollow back side of the packing nut and will "crush" or conform to the inside of the packing nut. Which one is correct? I'm laying odds that the small one is the rightr one.
Also, I am having great difficulty re-installing the plastic packing nut into the faucet. I tried lubing it up with silicone spray and then used engine assembly lube (had it laying around) but to no avail. It seems that this o-ring is just slightly too large. There is no corrosion inside the faucet. The guy at the plumbing supply place told me that I may have to lube it up to get it in. But man, I've messed with this thing and all it will do if it starts to go in is bunch up in one area. It just simply seems like it's slightly too large. Any ideas? I thought about going to the hardware store and trying to fit a slightly smaller o-ring. The replacement packing nut is exactly the same as the original one so the kit seems correct. The washer for the end is correct and the screw is also. I even tried gently heating up the faucet to expand it a bit. I'm stumped on this one.
Thanks for any advice!
|
|
Post Reply
|
|
|
Author:
KCRoto (MO)
Honestly I have never replace a packing washer in a frost free sillcock in my life. Around here someone usually forgets to take a hose off and it freezes and busts the body. In a typical gate valve, I usually just use teflon packing or teflon tape twisted into a cord to repack valves. I may just be reading it wrong, but the smaller washer fits into the opening, but it is too tall for the thread to catch after that? I am unclear on how it isn't fitting.
|
|
Post Reply
|
|
|
Author:
packy (MA)
i agree with KC on this..
possibly the repair kit is not the correct one for your 40 year old faucet??
|
|
Post Reply
|
|
|
Author:
Doug E. (CA)
put your planned set up in order on a flat table and take a picture and upload to this site for better advice, or bring whole set up to the counter of local plumbing supply house and get it built there, or scrap the brass for the down payment on a new faucet.
|
|
Post Reply
|
|
|
Author:
Turbo98 (MO)
Well, all the parts look like they are the correct ones. As far as the part that doesn't fit, it is the plastic packing nut. It needs to thread back into the faucet body. In order for the threads to start to catch, it needs to be pushed in a bit with the o-ring. I can't get the o-ring portion of the packing nut pushed into the faucet body.
|
|
Post Reply
|
|
|
Author:
KCRoto (MO)
Sometimes it just takes pushing and turning to get the threads to catch. Remember that for normal operation, the washer is completely smashed around the stem and the wall of the valve to create the seal it needs. It is possible that the replacement is simply too thick, but I would lube both sides up with plumbers grease. I know you used spray, but I don't know if would help as much as grease would in this instance.
|
|
Post Reply
|
|
|
Author:
Turbo98 (MO)
Yes, I did try turning it while pushing very hard. If it does start to go in, the o-ring bunches up in one spot and will not go in. I did use a grease (engine assembly lube). I'll try again though. I can take a picture if it would help also.
Thanks.
|
|
Post Reply
|
|
|
Author:
Turbo98 (MO)
For the threads to catch, I believe the o-ring has to go into the faucet pipe a little ways first.
|
|
Post Reply
|
|
|
Author:
KCRoto (MO)
A picture would help. There are only about as many makes of sillcocks as there models of cars.
|
|
Post Reply
|
|
|
Author:
Turbo98 (MO)
Ok. I'll get a pic tomorrow when I get home.
Thanks.
|
|
Post Reply
|
|
|
Author:
Turbo98 (MO)
Ok, here are a couple pics. The brownish plastic packing nut is the old one with the old o-ring. As you can see, they look identical (at least to me). The other pic is showing the end of the packing nut that butts up against the packing washer. I'm assuming that packing washer along with the metal brass washer will work?
Thanks.
[@#$%&[flic.kr]]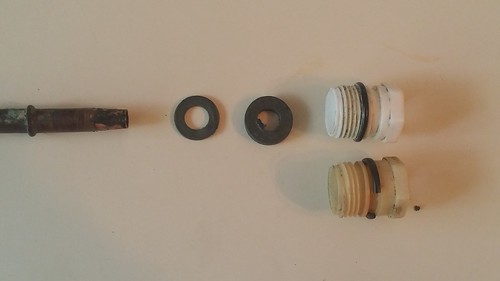 [/url] [/url]
[@#$%&[flic.kr]]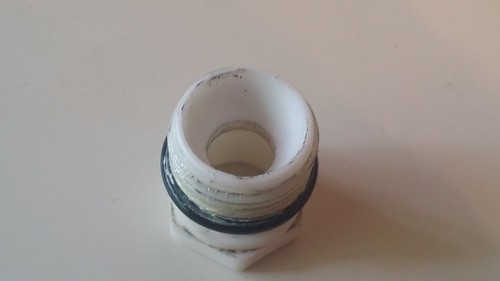 [/url] [/url]
|
|
Post Reply
|
|
|
Author:
KCRoto (MO)
yeah, it looks like the brass washer then the packing washer, then the nut. I would honestly try fitting it together without that O-ring on there. It may have to be there for some reason, but the seal is made by the packing, so it appears to be useless… The O-ring may have been busted by the last guy that rebuilt it with the wrong parts.
|
|
Post Reply
|
|
|
Author:
KCRoto (MO)
Went to Prier's site and found a hydrant that uses the same parts by the pictures since I don't know the actual model. They have a video guide on the site. [www.prier.com] I hope this helps.
|
|
Post Reply
|
|
|
Author:
Turbo98 (MO)
Ok. I'll go to their site again and look for the video. The repair kit I have is from Prier and it does look like it has the correct parts. I think the kit is somewhat universal and repairs several different models of hydrants.
As far as the o-ring. It seems to be leaking now because the old o-ring is brittle and basically crumble if not handled gently. I can check but I'm sure if I assemble it without it, it will leak badly. I'm going to head back to the plumbing place and see what they say.
Thanks.
|
|
Post Reply
|
|
|
Author:
Turbo98 (MO)
I went back to the plumbing store with all the old parts and new parts. He set me up with some new o-rings. They are the same thickness but smaller in diameter. So when they are stretched over the plastic packing nut, they should be slightly smaller in thickness than the original ones in the kit. I was then able to get one of them to go in. The other one still would not go in. So I installed the latest o-ring onto the old plastic packing nut and it went in. I since measured the diameter of the packing nuts with the same o-ring installed. The old packing nut/o-ring assembly measures .91". The new one measures .97". So I suppose it's not so much the o-ring that was different between the old and new but the diameter of the plastic packing nut. It was just enough that it would not go in. So if you have the right parts, the job is easy.
At any rate, the leaks appear to be stopped.
Thanks.
|
|
Post Reply
|
Please note:
- Inappropriate messages or blatant advertising will be deleted. We cannot be held responsible for bad or inadequate advice.
- Plbg.com has no control over external content that may be linked to from messages posted here. Please follow external links with caution.
- Plbg.com is strictly for the exchange of plumbing related advice and NOT to ask about pricing/costs, nor where to find a product (try Google), nor how to operate or promote a business, nor for ethics (law) and the like questions.
- Plbg.com is also not a place to ask radiant heating (try HeatingHelp.com), electrical or even general construction type questions. We are exclusively for plumbing questions.
Search for plumbing parts on our sponsor's site:
Special thanks to our sponsor:

|